Make a remote-controlled rover robot using a Raspberry Pi and a webcam.
Wouldn't it be cool to have a Raspberry Pi robot with a camera on board? For this project, I created a Raspberry Pi rover robot that can be controlled using a smartphone with video streaming! Sound interesting? Here's how:
Raspberry Pi Rover Robot Concept
A rover is basically a remote-controlled vehicle used to access areas that are inaccessible by humans. NASA's
Curiosity is a well-known rover robot. I decided to build my own simple rover using a Raspberry Pi board and a web camera. The USB webcam acts as the controller's eyes, which is typical of rovers (they are not autonomous). We can then control the movements of the robot using buttons on a locally hosted web page where the same video stream from the camera is embedded. I made the robot control more secure by making the Raspberry Pi a Wi-Fi access point. This means only users that know the Wi-Fi ID and password of the robot can view the video stream and control it.
Raspberry Pi Rover Hardware Assembly
I attached the gearbox and wheels assembly to the edge of the first platform and the ball wheel to the other edge:
On that same platform, I attached the battery pack using a velcro strap. I mounted the motor driver here as well:
Here's the motor driver connection (not seen in the schematic: a 1uF capacitor from VCC to GND):
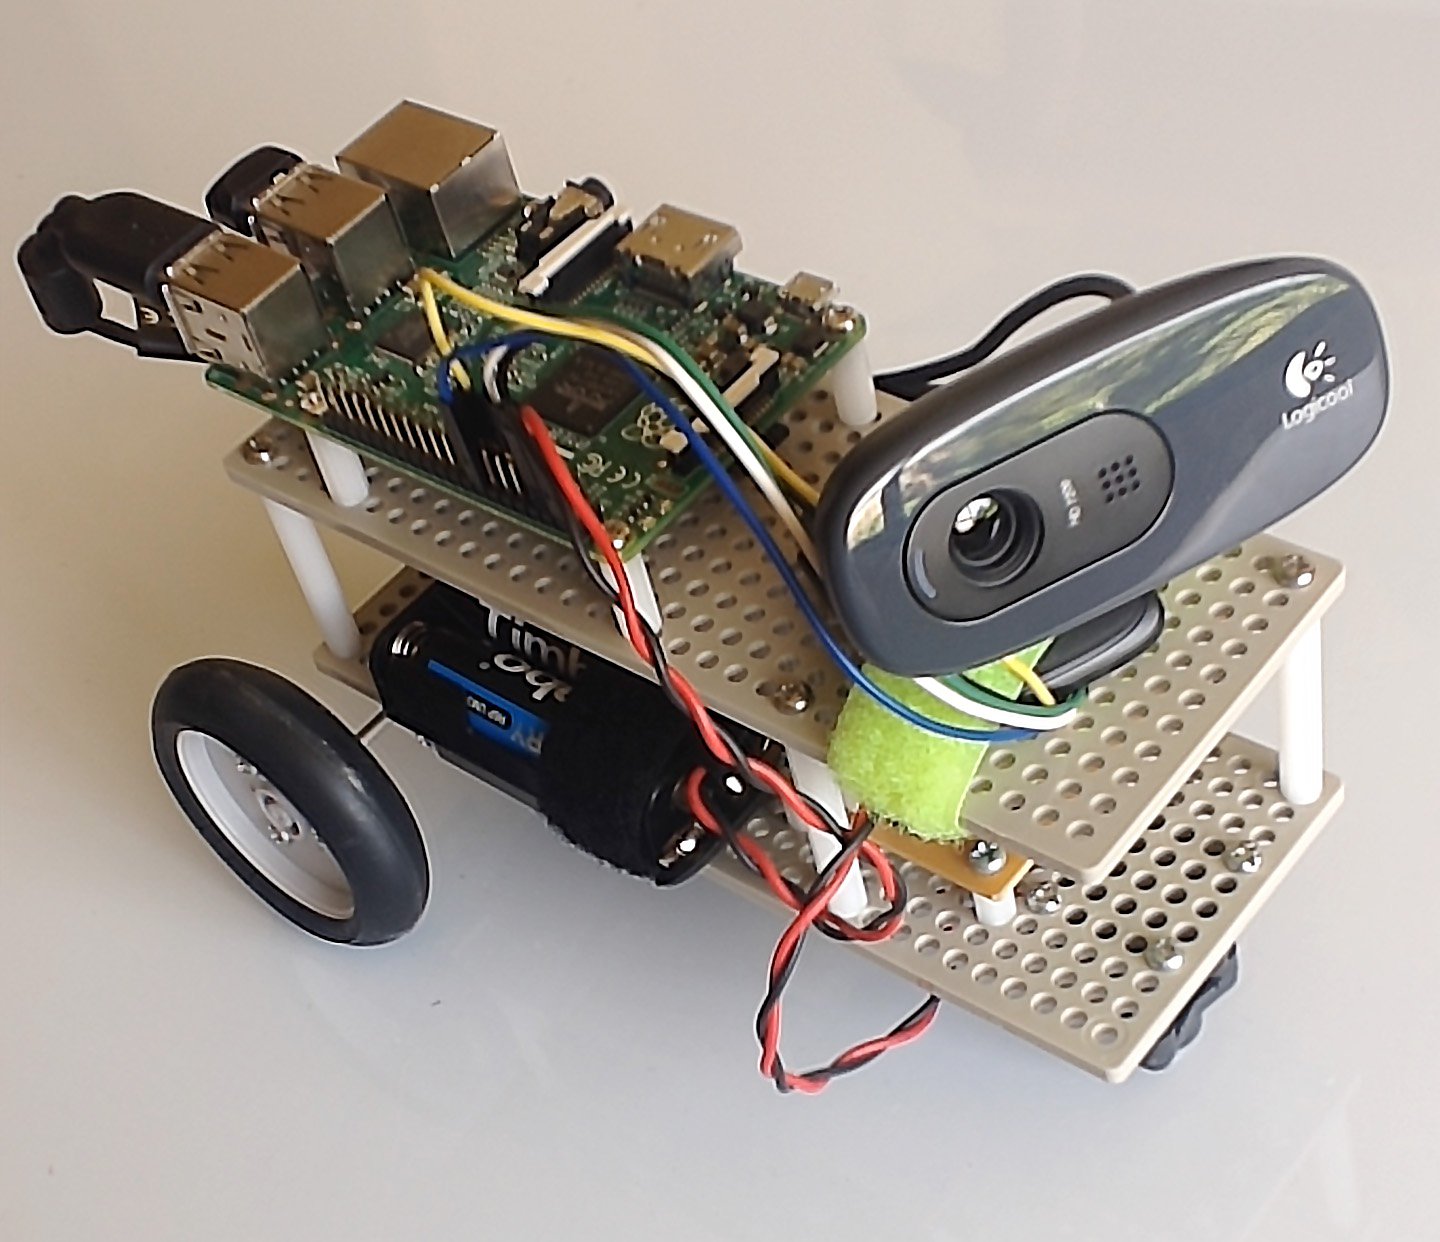
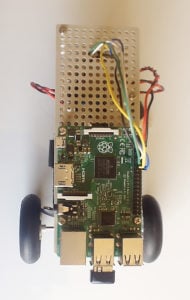
Using plastic posts, I attached the second platform and then attached the Raspberry Pi board (with the Wi-Fi dongle plugged).
Here's the robot with the USB webcam attached:
Configuring the Software
This is one of those projects where the software configuration is much more difficult than the hardware.
Warning: this stuff might be too complex for beginners.
Installing mjpg-streamer and JPEG Library
First, access your Raspberry Pi via SSH. Then paste the following commands:
sudo apt-get update
sudo apt-get upgrade
sudo apt-get install cmake libjpeg8-dev
git clone https://github.com/jacksonliam/mjpg-streamer.git
Go to the extracted mjpg-streamer library then run make:
cd mjpg-streamer/mjpg-streamer/mjpg-streamer-experimental
make
sudo make install
Go one folder above then copy the mjpg-streamer folder to /usr/local/bin. Do the same for the plugins output_http.so and input_uvc.so.
sudo cp mjpg_streamer /usr/local/bin
sudo cp output_http.so input_uvc.so /usr/local/lib/
This enables us to stream the video captured by the webcam. But where can we view it? We need a web page hosted by a server for that.
To create a server for the Raspberry Pi, download Apache:
sudo apt-get install apache2 -y
This will create a webpage that can be accessible via a browser.
To test the video stream:
export LD_LIBRARY_PATH=/usr/local/lib
mjpg_streamer -i "input_uvc.so -f 10 -r 320x240 -d /dev/video0 -y" -o "output_http.so -w /var/www/html -p 8080"
Open a browser from a computer or smartphone with the same network as your RPi. To view the stream, just go to your Pi's address. For example, my pi is at http://192.168.1.6. I was able to see the video stream on that address.
Configuring the RPi as an Access Point
Now we want to control the robot only when we are connected to it and not anyone else within the network. To do that, we want the RPi to be the access point.
The first step is to give the RPi a static IP address. To do that, edit /etc/dhcpcd.conf and add the following lines:
#static ip address for eth0
interface eth0
static ip_address=192.168.1.6/24
static routers=192.168.1.1
static domain_name_servers=192.168.1.1
#static ip address for wlan0
interface wlan0
static ip_address=192.168.0.1/24
This will give the RPi a static IP address of 192.168.1.6 when accessed from the ethernet port (for SSH) and 192.168.0.1 from Wi-Fi (which we'll be our access point to control the robot).
Next, we need to install a DHCP server.
sudo apt-get install isc-dhcp-server
Then edit /etc/dhcp/dhcpd.conf:
sudo nano /etc/dhcp/dhcdp.conf
Comment all lines with "option domain-name" on it by adding "#", for example:
#option domain-name "example.org";
#option domain-name-servers ns1.example.org, ns2.example.org;
Also, remove the "#" sign in front of the "authoritative;" statement like this:
# If this DHCP server is the official DHCP server for the local
# network, the authoritative directive should be uncommented.
authoritative;
Then add the following lines at the bottom:
subnet 192.168.0.0 netmask 255.255.255.0 {
range 192.168.0.21 192.168.0.50;
option broadcast-address 192.168.0.255;
option domain-name "local";
option domain-name-servers 8.8.8.8, 8.8.4.4;
}
Exit from nano using CTRL+X and choose "Y".
You may need to restart the DHCP server:
sudo service isc-dhcp-server restart
Next, we need to install the access point daemon:
sudo apt-get install hostapd
Edit the config file of hostapd:
sudo nano /etc/hostapd/hostapd.conf
And add the following lines at the bottom of the file:
interface=wlan0
driver=nl80211
ssid=rover-wifi
hw_mode=g
channel=1
macaddr_acl=0
auth_algs=1
ignore_broadcast_ssid=0
wpa=2
wpa_passphrase=12345678
wpa_key_mgmt=WPA-PSK
wpa_pairwise=TKIP
rsn_pairwise=CCMP
Again, close nano and save the file.
This will create an SSID rover-wifi which we can access using the passcode 12345678.
Lastly, we need to tell hostapd the default configuration file. To do that, edit hostapd:
sudo nano /etc/default/hostapd
And remove the # infront of DAEMON_CONF = "/etc/hostapd/hostapd.conf"
Close nano and save the file.
Creating Control Scripts
Alright, now that we've got the camera stream going and made the RPi an access point, we need to have some sort of control mechanism for the robot. We can edit the index.html file where we embed the video stream and add buttons to it to move or stop the robot.
Create a folder in the home directory:
Next, create a shell script named init.sh with these contents:
#!/bin/sh

echo 17 > /sys/class/gpio/export
echo 27 > /sys/class/gpio/export
echo 22 > /sys/class/gpio/export
echo 23 > /sys/class/gpio/export
echo out > /sys/class/gpio/gpio17/direction
echo out > /sys/class/gpio/gpio27/direction
echo out > /sys/class/gpio/gpio22/direction
echo out > /sys/class/gpio/gpio23/direction
These will reserve the pins 17, 27, 22, and 23 for motor control.
Then we need four scripts to make the robot go forward, turn left, turn right, and stop:
#!/bin/sh
echo 1 > /sys/class/gpio/gpio17/value
echo 0 > /sys/class/gpio/gpio27/value
echo 1 > /sys/class/gpio/gpio22/value
echo 0 > /sys/class/gpio/gpio23/value
#!/bin/sh

echo 0 > /sys/class/gpio/gpio17/value
echo 1 > /sys/class/gpio/gpio27/value
echo 0 > /sys/class/gpio/gpio22/value
echo 1 > /sys/class/gpio/gpio23/value
#!/bin/sh

echo 0 > /sys/class/gpio/gpio17/value
echo 1 > /sys/class/gpio/gpio27/value
echo 1 > /sys/class/gpio/gpio22/value
echo 0 > /sys/class/gpio/gpio23/value
#!/bin/sh

echo 1 > /sys/class/gpio/gpio17/value
echo 0 > /sys/class/gpio/gpio27/value
echo 0 > /sys/class/gpio/gpio22/value
echo 1 > /sys/class/gpio/gpio23/value
#!/bin/sh

echo 0 > /sys/class/gpio/gpio17/value
echo 0 > /sys/class/gpio/gpio27/value
echo 0 > /sys/class/gpio/gpio22/value
echo 0 > /sys/class/gpio/gpio23/value
Editing the Web Page
We're not done yet! Delete the index.html page where the video was streamed earlier:
sudo rm /var/www/html/index.html
Then create a new index.html file:
sudo nano /var/www/html/index.html
With this as content:
<html>
<head>
<meta charset="UTF-8">
<title>RaspberryPi Camera Robot</title>
<script type="text/javascript">
function button(value) {
var request = false;
if(window.XMLHttpRequest){
request = new XMLHttpRequest();
}else if(window.ActiveXObject){
try {
request = new ActiveXObject("Msxml2.XMLHTTP");
} catch(e) {
request = new ActiveXObject("Msxml.XMLHTTP");
}
}
//XMLHttpRequest failed
if(!request){
alert("XMLHttpRequest failed...");
return false;
}
//query
var send = 'code=' + value;
request.open('POST','/rover.php',true);
//HTML header
request.setRequestHeader('Content-Type','application/x-www-form-urlencoded');
request.setRequestHeader('Content-Length',send.length);
request.setRequestHeader('Connection','close');
request.send(send);
}
</script>
</head>
<body>
<img src="http://192.168.0.1:8080/?action=stream" />
<br>

<input type="button" value="right" onClick="button('right')">
<input type="button" value="front" onClick="button('front');">
<input type="button" value="back" onClick="button('back');">
<input type="button" value="left" onClick="button('left');">
<input type="button" value="stop" onClick="button('stop');">

</body>
</html>
Close nano and save the file.
We also need a rover.php file that will allow us to issue shell commands from the web page:
<?php
$code = $_POST['code'];
switch($code){
case "right": system("sudo /home/pi/rover/rr.sh");
break;
case "front": system("sudo /home/pi/rover/fwd.sh");
break;
case "back": system("sudo /home/pi/rover/rwd.sh");
break;
case "left": system("sudo /home/pi/rover/ll.sh");
break;
case "stop": system("sudo /home/pi/rover/stop.sh");
break; default: }
?>
Writing the Stream Script
We need to make a script for the video stream. On the same folder rover we created, create a stream.sh script:
#!/bin/sh

PORT="8080"
ID="rover"
PW="1234"
SIZE="320x240"
FRAMERATE="10"

export LD_LIBRARY_PATH=/usr/local/lib
mjpg_streamer -i "input_uvc.so -f $FRAMERATE -r $SIZE -d /dev/video0 -y" -o "output_http.so -w /var/www/html -p $PORT"
Making the Scripts Load on Boot
Finally, to make these scripts run as the Raspberry Pi is opened, edit rc.local.
Add the following lines below the file:
#RPi Rover
sleep 2
/home/pi/rover/stream.sh &
/home/pi/rover/init.sh
This will run stream.sh and init.sh when the RPi boots up.
All the needed shell scripts, as well as the webpages, are found on my Raspberry Pi rover robot repository. That's it for the software part!
Finished Robot
To start controlling the robot, use a smartphone or laptop and connect to the robot Wi-Fi access point
rover-wifi with password
12345678.
Use your favorite browser and open the page http://192.168.0.1. You should see something like this:
Press the buttons and watch the robot move!
Here's the Raspberry Pi rover robot in action: