Wanna learn about image recognition systems? Start with this License Plate Recognition project on Raspberry Pi!
In this tutorial, I’ll show you how to build a license plate recognition (LPR) system (also sometimes referred to as automatic license plate recognition using OpenCV on Raspberry Pi.
We’ll begin by setting up the actual license plate detection, which is the most important stage of the system. At this stage, the system determines the position of the license plate, inputs an image of the vehicle, and outputs the license plate.
From there, we move onto character segmentation, where the characters on the license plate get mapped out and segmented into individual images.
Finally, the system performs character recognition, where the characters we segmented in the second step are identified. This is where machine learning comes in.
Installation of Prerequisites
Begin by ensuring that your Raspberry Pi is up to date by typing the following commands. These commands will update the installed packages on your Raspberry pi to the latest versions.
sudo apt-get update
 sudo apt-get upgrade
These commands update the installed packages on your Raspberry pi to the latest versions.
Then type:
sudo apt install libatlas3-base libsz2 libharfbuzz0b libtiff5 libjasper1 libilmbase12 libopenexr22 libilmbase12 libgstreamer1.0-0 libavcodec57 libavformat57 libavutil55 libswscale4 libqtgui4 libqt4-test libqtcore4
to install required packages for OpenCV on your Raspberry pi.
After that, type:
sudo pip3 install opencv-contrib-python libwebp6
to install OpenCV 3 for python 3 on your Raspberry pi. Pip3 means that OpenCV will get installed for python 3.
The last library we need to install is NumPy. NumPy is a library that makes it very easy to perform array operations in Python. Type the following command to install it.
Pip3 install python-numpy
Cloning GitHub Repository
Now we are going to clone the License Plate Recognition GitHub repository by Chris Dahms. Thank you, Chris!
This repository contains all the files that we need to recognize license plates. His code can only recognize number plates from an image, so later in the tutorial, we are going to update this code to work in real-time.
Recognizing License Plates in an Image
First, the code from GitHub reads out the training classifications and will train the KNN object that recognizes characters.
try:
        npaClassifications = np.loadtxt("classifications.txt", np.float32)                  # read in training classifications
    except:                                                                                 # if file could not be opened
        print("error, unable to open classifications.txt, exiting program\n")  # show error message
        os.system("pause")
        return False                                                                        # and return False
    # end try

    try:
        npaFlattenedImages = np.loadtxt("flattened_images.txt", np.float32)                 # read in training images
    except:                                                                                 # if file could not be opened
        print("error, unable to open flattened_images.txt, exiting program\n")  # show error message
        os.system("pause")
        return False                                                                        # and return False
    # end try

    npaClassifications = npaClassifications.reshape((npaClassifications.size, 1))       # reshape numpy array to 1d, necessary to pass to call to train

    kNearest.setDefaultK(1)                                                             # set default K to 1

    kNearest.train(npaFlattenedImages, cv2.ml.ROW_SAMPLE, npaClassifications)
After that, we check whether training was successful or not. If training isn’t successful, it will show an error.
if blnKNNTrainingSuccessful == False:                               # if KNN training was not successful
        print("\nerror: KNN traning was not successful\n")  # show error message
        return
Then it reads out the image and checks whether it was properly read or not. If image read isn’t successful, it will show an error.
imgOriginalScene  = frame #cv2.imread("LicPlateImages/car.jpg")               # open image

    if imgOriginalScene is None:                            # if image was not read successfully
        print("\nerror: image not read from file \n\n")  # print error message to std out
        os.system("pause")                                  # pause so user can see error message
        return
In the next step, the system tries to detect the region of possible plates in the image. Detecting the plates consists of following steps.
1. Downsampling the image.
imgGrayscale = extractValue(imgOriginal)
def extractValue(imgOriginal):
    height, width, numChannels = imgOriginal.shape
    imgHSV = np.zeros((height, width, 3), np.uint8)
    imgHSV = cv2.cvtColor(imgOriginal, cv2.COLOR_BGR2HSV)
    imgHue, imgSaturation, imgValue = cv2.split(imgHSV)
    return imgValue
imgThresh = cv2.adaptiveThreshold(imgBlurred, 255.0, cv2.ADAPTIVE_THRESH_GAUSSIAN_C, cv2.THRESH_BINARY_INV, ADAPTIVE_THRESH_BLOCK_SIZE, ADAPTIVE_THRESH_WEIGHT)
3. Finding and drawing contours.
imgContours, contours, npaHierarchy = cv2.findContours(imgThreshCopy, cv2.RETR_LIST, cv2.CHAIN_APPROX_SIMPLE)
height, width = imgThresh.shape
imgContours = np.zeros((height, width, 3), np.uint8)
 for i in range(0, len(contours)):
         if Main.showSteps == True: # show steps
               cv2.drawContours(imgContours, contours, i, Main.SCALAR_WHITE)
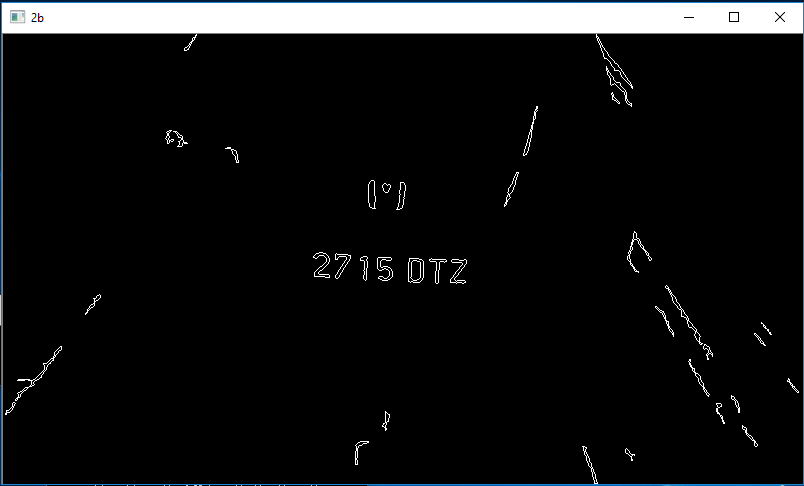
4. Finding possible characters in the image.
for possibleChar in listOfPossibleCharsInScene:
            contours.append(possibleChar.contour)
        # end for
        cv2.drawContours(imgContours, contours, -1, Main.SCALAR_WHITE)
        cv2.imshow("2b", imgContours)
5. Matching characters in the image.
for listOfMatchingChars in listOfListsOfMatchingCharsInScene:
            intRandomBlue = random.randint(0, 255)
            intRandomGreen = random.randint(0, 255)
            intRandomRed = random.randint(0, 255)
            contours = []
            for matchingChar in listOfMatchingChars:
                contours.append(matchingChar.contour)
            # end for
            cv2.drawContours(imgContours, contours, -1, (intRandomBlue, intRandomGreen, intRandomRed))
6. Extracting plate area.
for i in range(0, len(listOfPossiblePlates)):
            p2fRectPoints = cv2.boxPoints(listOfPossiblePlates[i].rrLocationOfPlateInScene)
            cv2.imshow("4b", listOfPossiblePlates[i].imgPlate)
Detecting Characters in the Plate Region
1. Downsampling license plate region.
imgGrayscale = extractValue(imgOriginal)
def extractValue(imgOriginal):
    height, width, numChannels = imgOriginal.shape
    imgHSV = np.zeros((height, width, 3), np.uint8)
    imgHSV = cv2.cvtColor(imgOriginal, cv2.COLOR_BGR2HSV)
    imgHue, imgSaturation, imgValue = cv2.split(imgHSV)
    return imgValue
2. Applying a threshold to license plate region.
imgThresh = cv2.adaptiveThreshold(imgBlurred, 255.0, cv2.ADAPTIVE_THRESH_GAUSSIAN_C, cv2.THRESH_BINARY_INV, ADAPTIVE_THRESH_BLOCK_SIZE, ADAPTIVE_THRESH_WEIGHT)
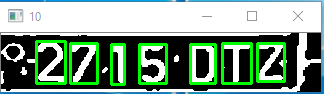
3. Resizing for easier viewing and character detection and applying the threshold again to eliminate any gray areas.
possiblePlate.imgThresh = cv2.resize(possiblePlate.imgThresh, (0, 0), fx = 1.6, fy = 1.6)
imgContours = np.zeros((height, width, 3), np.uint8)
            del contours[:]                                         # clear the contours list
            for possibleChar in listOfPossibleCharsInPlate:
                contours.append(possibleChar.contour)
            # end for
            cv2.drawContours(imgContours, contours, -1, Main.SCALAR_WHITE)
5. Recognizing the characters using the trained KNN object.
retval, npaResults, neigh_resp, dists = kNearest.findNearest(npaROIResized, k = 1)
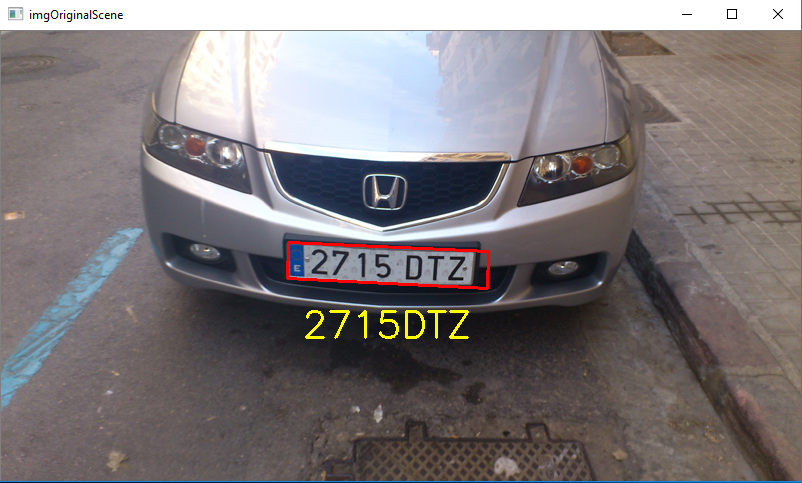
Then we draw a rectangle in the original image and write the numbers below in the license plate.
drawRedRectangleAroundPlate(imgOriginalScene, licPlate)
writeLicensePlateCharsOnImage(imgOriginalScene, licPlate)
You can recognize license plates from other images by adding the images in the LicPlateImages directory.
Type the following command to run the code.
Recognizing License Plates in Real-time
Now we are going to recognize a license plate in real-time using the camera with the Raspberry Pi to capture the frames. When any key will be pressed, it will take that frame and should recognize the license plate from the captured image.
We need to make a few changes in the code we used in the previous example in order to make it work in real-time.
Instead of reading the images, we will add the camera object to help us access the camera on the Raspberry Pi.
cap = cv2.VideoCapture(0)
Next, we will use this camera object to capture frames one by one and show these on the output window.
_, frame = capture.read()
cv2.imshow('frame', frame)
After that, we need to wait for some time to set up what will happen if any keys get pressed. If any key is pressed, it will stop to take new frames and will start to recognize license plates in the current frame.
key = cv2.waitKey(1)
        if key == 27:
            break
Note that the real-time output depends a lot on the camera quality.