By using code onBy using code on the Raspberry Pi to control the I/O pins to further do the LED, you will learn some basic programming and how to control. Now get to start and you will enjoy the fun of DIY at once!
Take out an LED, a 220Ω resistor and several jumper wires.
Principle
First, we should be clear about the principle of LED blinking. A LED is a light-emitting diode, and it will be on if its anode is connected to a high voltage and cathode to a low one. But, it can be burnt if it is connected directly in a 3.3V circuit, thus it should be connected to a resistor for current limit to protect the LED.
Here is the circuit diagram. Its anode has been connected to a current-limiting resistor, and a 3.3V voltage, so we only need to connect the cathode to an I/O port of low level to lighten up the LED. If a high level is given to its cathode, the LED will be off because there is no voltage drop between its anode and cathode which are both 3.3V. The cathode is connected to pin B17, pin17 of the Raspberry Pi by BCM numbering method.
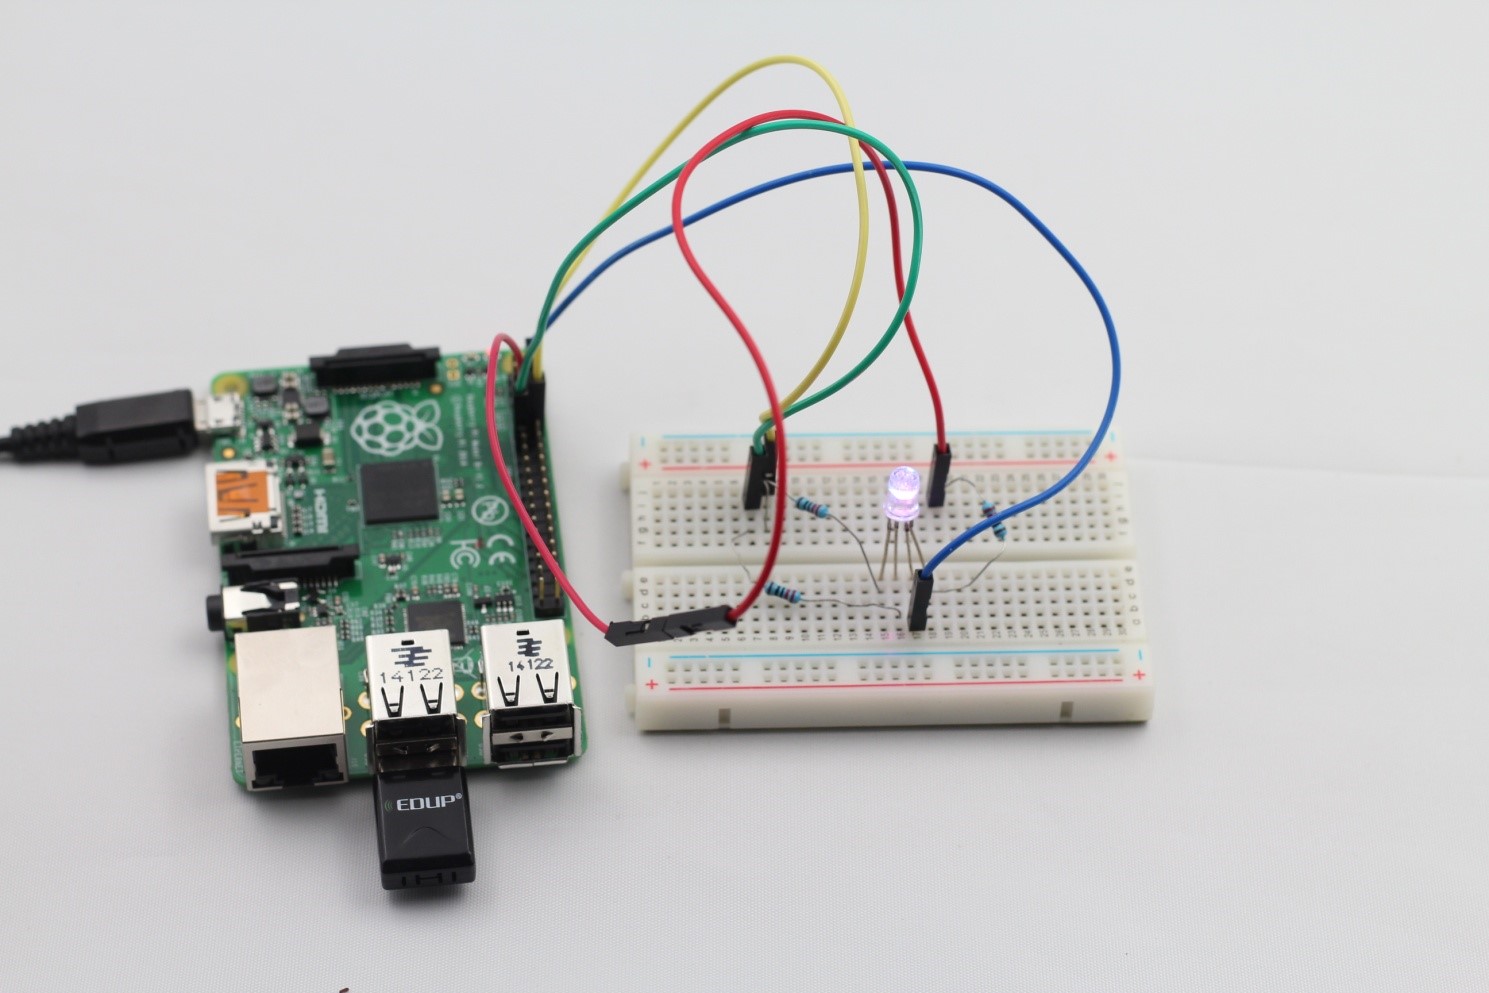
The wiring of this experiment is shown as below:
Programming
For Linux, Mac OS X Users or screen users
If you are a beginner, you’re recommended to connect a screen to the Raspberry Pi to use. Therefore, operations on the Raspberry Pi will be as simple as on the Linux. For convenience, the following tutorials will be implemented with a display. In addition, we will use a “beginner-friendly” language – Python to elaborate.
To keep the file system well organized, create a folder named RPi_Beginner under the /home/pi/ directory first:
Open Bash Shell (Terminal), and type in the command:
cd ~
mkdir RPi_Beginner
Then the code folder is created. Keep all the newly-written code here to ensure the sketches are in order.
Now, let’s get started!
Click Menu in the upper left corner, and select Programming -> Python 2 (IDLE) (we use the Python 2 here).
Then a Python Shell pops up, which is the interactive programming window of Python.
LED ON
Click File in the upper left corner, and select New File to create a new code window.
A new window will pop up then.
Type in the following code:
import RPi.GPIO as GPIO # First, import a Python module of Raspbian to control
# the GPIO, and name it as GPIO.
GPIO.setmode(GPIO.BCM) # Second, set the BCM numbering method for the pins
# on the T-extension
# board are also named in this way.
GPIO.setup(17, GPIO.OUT) # Third, set pin 17 as output.
GPIO.output(17, GPIO.LOW) # Finally, set pin 17 as low-voltage, that is to light up
# the LED.
Quite easy, right? Python is a kind of easy-to-understand programming language, so it’s very convenient to use.
Then select File -> Save after finishing.
Save it under the RPi_Beginner folder and name as led.py, and click Save.
It’s easy to run in the Python IDLE:
Click Run -> Run Module, or press F5 to run.
The LED will be lightened when you run this, and a Python Shell will pop up, indicating some simple information. But sometimes a warning may be shown:
It reads that the GPIO has been occupied, but we can continue anyway. Follow the warning’s instruction to add a line GPIO.setwarning(False) under the import line to remove it if you feel it’s annoying. But we don't recommend this way; this warning is caused by some reasons after all, and we will talk about this and learn how to solve it properly later.
For Windows Users
For users who don’t have a display, you can use the nano command to edit the code in Bash Shell, exit after saving the code, and then run it in the Python.
Log into the Raspberry Pi remotely
1. Go to RPi_Beginner:
cd ~/RPi_Beginner
2. Create a new file named led.py
nano led.py
A Python sketch name always ends with a suffix ”.py”, and nano led.py means opening the file led.py by nano command, and enabling us to modify this ”.py” file. If there is no such file found, the Bash will create a led.py file itself. Press Enter, and a blank window will show, in which you can start the programming.
Type in the code
When you finish the code, press Ctrl + O to save, and then Ctrl + X to exit.
Run the code
python led.py
LED OFF
The LED too dazzling? Let’s see how to turn it off.
Just modify GPIO.LOW to GPIO.HIGH in the last line, like this:
import RPi.GPIO as GPIO
GPIO.setmode(GPIO.BCM)
GPIO.setup(17, GPIO.OUT)
GPIO.output(17, GPIO.HIGH)
After the part for LED off is done, save and run. Then you'll see the LED goes out. the Raspberry Pi to control the I/O pins to further do the LED, you will learn some basic programming and how to control. Now get to start and you will enjoy the fun of DIY at once!
Take out an LED, a 220Ω resistor and several jumper wires.
Principle
First, we should be clear about the principle of LED blinking. A LED is a light-emitting diode, and it will be on if its anode is connected to a high voltage and cathode to a low one. But, it can be burnt if it is connected directly in a 3.3V circuit, thus it should be connected to a resistor for current limit to protect the LED.
Here is the circuit diagram. Its anode has been connected to a current-limiting resistor, and a 3.3V voltage, so we only need to connect the cathode to an I/O port of low level to lighten up the LED. If a high level is given to its cathode, the LED will be off because there is no voltage drop between its anode and cathode which are both 3.3V. The cathode is connected to pin B17, pin17 of the Raspberry Pi by BCM numbering method.
The wiring of this experiment is shown as below:
Programming
For Linux, Mac OS X Users or screen users
If you are a beginner, you’re recommended to connect a screen to the Raspberry Pi to use. Therefore, operations on the Raspberry Pi will be as simple as on the Linux. For convenience, the following tutorials will be implemented with a display. In addition, we will use a “beginner-friendly” language – Python to elaborate.
To keep the file system well organized, create a folder named RPi_Beginner under the /home/pi/ directory first:
Open Bash Shell (Terminal), and type in the command:
cd ~
mkdir RPi_Beginner
Then the code folder is created. Keep all the newly-written code here to ensure the sketches are in order.
Now, let’s get started!
Click Menu in the upper left corner, and select Programming -> Python 2 (IDLE) (we use the Python 2 here).
Then a Python Shell pops up, which is the interactive programming window of Python.
LED ON
Click File in the upper left corner, and select New File to create a new code window.
A new window will pop up then.
Type in the following code:
import RPi.GPIO as GPIO # First, import a Python module of Raspbian to control
# the GPIO, and name it as GPIO.
GPIO.setmode(GPIO.BCM) # Second, set the BCM numbering method for the pins
# on the T-extension
# board are also named in this way.
GPIO.setup(17, GPIO.OUT) # Third, set pin 17 as output.
GPIO.output(17, GPIO.LOW) # Finally, set pin 17 as low-voltage, that is to light up
# the LED.
Quite easy, right? Python is a kind of easy-to-understand programming language, so it’s very convenient to use.
Then select File -> Save after finishing.
Save it under the RPi_Beginner folder and name as led.py, and click Save.
It’s easy to run in the Python IDLE:
Click Run -> Run Module, or press F5 to run.
The LED will be lightened when you run this, and a Python Shell will pop up, indicating some simple information. But sometimes a warning may be shown:
It reads that the GPIO has been occupied, but we can continue anyway. Follow the warning’s instruction to add a line GPIO.setwarning(False) under the import line to remove it if you feel it’s annoying. But we don't recommend this way; this warning is caused by some reasons after all, and we will talk about this and learn how to solve it properly later.
For Windows Users
For users who don’t have a display, you can use the nano command to edit the code in Bash Shell, exit after saving the code, and then run it in the Python.
Log into the Raspberry Pi remotely
1. Go to RPi_Beginner:
cd ~/RPi_Beginner
2. Create a new file named led.py
nano led.py
A Python sketch name always ends with a suffix ”.py”, and nano led.py means opening the file led.py by nano command, and enabling us to modify this ”.py” file. If there is no such file found, the Bash will create a led.py file itself. Press Enter, and a blank window will show, in which you can start the programming.
Type in the code
When you finish the code, press Ctrl + O to save, and then Ctrl + X to exit.
Run the code
python led.py
LED OFF
The LED too dazzling? Let’s see how to turn it off.
Just modify GPIO.LOW to GPIO.HIGH in the last line, like this:
import RPi.GPIO as GPIO
GPIO.setmode(GPIO.BCM)
GPIO.setup(17, GPIO.OUT)
GPIO.output(17, GPIO.HIGH)
After the part for LED off is done, save and run. Then you'll see the LED goes out.