Access your files from anywhere in the world with this web server made with a Raspberry Pi.
In this tutorial, I am going to show you how to set up a web server in your home using a Raspberry Pi. Creating your own personal Raspberry Pi web server allows you to access your files from anywhere in the world through the internet. There's no need to worry about the DDNS Client — you can get it for free from no-ip.com. We will be using Apache, PHP, and MySQL to build this Raspberry Pi web server. Let's get started!
Resources
Basic Linux Commands for Beginners
How Does the Raspberry Pi Web Server Work?
We will be first setting up your Raspberry Pi as a local server by installing Apache, PHP, and MySQL and testing it. After doing this, this local server can be converted into a web server through port forwarding technique from your router. After performing port forwarding, your Raspberry Pi will be accessible through the internet, as your router will point to it. Check out this block diagram for the detailed step-by-step process to build your Raspberry Pi web server.
Installing Apache, PHP, and MySQL for your Raspberry Pi Web Server
Before we start, make sure your Raspberry Pi is up to date, and if not, update it by running the command below in your terminal:
sudo apt-get update Next, we will start installing all the packages necessary for our Raspberry Pi web server. But before that, perform the command below. This helps you to get in to the root of our system. So from now on, we do not need to use the "sudo" command all the time.
sudo bash
Now, let's install Apache, the main component of the project. For that, use the following command:
apt-get install apache2 apache2-doc apache2-utils
After this, it is time to install PHP on our Pi:
apt-get install libapache2-mod-php5 php5 php-pear php5-xcache
These won't take long. Now we should install the package for database connectivity (PHP->SQL):
apt-get install php5-mysql
Now we can install the MySQL server, which stores everything and acts as our database for the Raspberry Pi web server:
apt-get install mysql-server mysql-client
During this installation, you will be asked for a password for the server. Enter a password that you will remember. That's it! You have completed the first step! Now reboot the Pi.
Testing the Installed Packages on the Raspberry Pi
Type "localhost" or "127.0.0.1" in the Pi's web browser. If you have SSH'd into it, type the Pi's IP address in your browser. Now you should see a page saying "It works!" If you see it, the server is set up correctly. If it doesn't, you should repeat with the commands listed above and check for errors.
You can edit the web page by changing the index.html file in the '/var/www' directory. You can put anything into that folder and you can see it in your local area network when the Pi's IP address is entered. Watch this tutorial for learning about HTML and web page editing.
Now, for testing on your Raspberry Pi, open up LXTerminal and type as follows:
sudo mysql -uroot -p
This should ask you for the password you entered during the installation. If you have entered the correct password, you should get a screen like this.
You can now use MySQL to control your databases. An easier way to do that is down below.
Installing phpMyAdmin for your Raspberry Pi Web Server
PhpMyAdmin is a free and open source tool written in PHP intended to handle the administration of MySQL or MariaDB with the use of a web browser. This makes it easier to control the database. To install it on your Raspberry Pi web server, you can use the following commands.
Open the terminal and let's start with:
sudo apt-get install phpmyadmin
This will start installing the packages. You will be asked which web server is to be used. Choose apache2.
Next, we will need to configure the database phpMyAdmin should use. For that you should select Yes when asked:
After this, you will be asked for an administrative password. Type in the password for the MySQL database you installed earlier. Next, you will be asked for a custom password for phpMyAdmin. I typed in the same password of MySQL, as it will be easier to remember. If you wish, you can have another password too.
Now we need to combine Apache with phpMyAdmin. For that, you should edit the apache2.conf file. Type the following in the terminal:
sudo nano /etc/apache2/apache2.conf
At the end of this file (navigate using Ctrl+V), add a line:
Include /etc/phpmyadmin/apache.conf
Restart the server using:
sudo /etc/init.d/apache2 restart
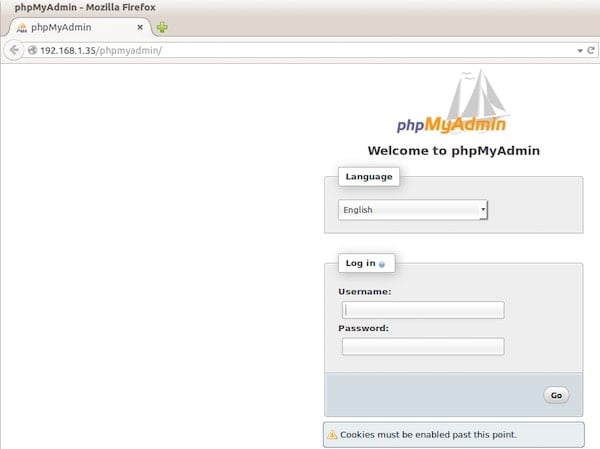
Now, check out the link in your web browser: <pi's ip address>/phpmyadmin or localhost/phpmyadmin in your Pi. You should see the page below.
As the username, you can type in "root", and as the password, you can type in the password you gave for the MySQL server. If that doesn't work, just try with the phpMyAdmin password. If you can log in successfully, voila! That's done.
Now, you can have your own site by customizing the index.html or by inserting a customized HTML file and renaming it as index.html in the www folder. You can put images, videos, or whatever you want in the www folder and access it in your local area network (LAN). Now that you also have a database of your own, you can maintain the site with it.
Now, we are going to make our local server available to the whole world! Follow the steps below to do it:
Giving your Raspberry Pi a Static IP Address
Now, you won't be able to access your server from another network. You can only access your server within your local network. We are going to make our server available worldwide to the internet! Let's start connecting our Raspberry Pi web server to the internet.
The modem in your house gives a number to all devices connected to it to understand the devices. This number is called the internet protocol (IP) address. It is something like this xxx.xxx.x.x.
There are two types of IP addresses: internal IP addresses and external IP addresses. What I mentioned above was about the internal IP address: a number given from the modem to the connected devices to locate it. There is a number given to your modem by your internet service provider (ISP) to locate computers and systems. This number is called as an external IP address.
We are going to talk about the internal one.
Our modem gives us a random number. Mostly, it starts like 192.168.1.xxx or 192.168.0.xxx or 192.168.xxx.xxx. The random number is called by a name or DHCP. The hostname is also similar to the IP address. It is a label given to devices connected to a network to identify them. The IP Address of the Pi is set to DHCP. We need to change that into a static IP address. For that, we need to edit a file in our Pi. Before that, we need to gather some information about our network. For that, type in the following commands. Have paper and a pen with you before that!
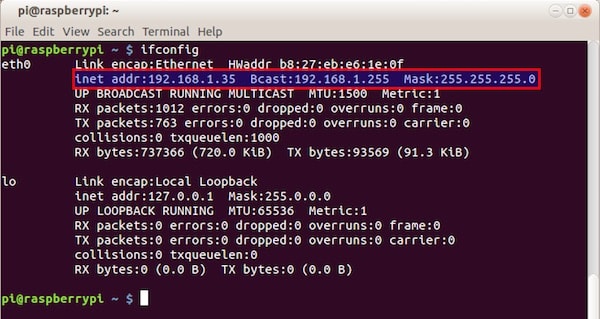
Perform the command: ifconfig
Note the highlighted line in the above picture.
- inet address: 192.168.1.35
- Bcast: 192.168.1.255
- Mask: 255.255.255.0
Now, we need the gateway and destination address. For that, type in the following command:
netstat -nr
Take a note of the highlighted parts:
- Destination: 192.168.1.0
- Gateway: 192.168.1.1
Now let's edit the network interfaces. It is located in /etc/network/interfaces.
sudo nano /etc/network/interfaces
In this file, you can see something like this:
The highlighted part, which is iface eth0 inet dhcp, should be changed to iface eth0 inet static.
Under that line, add the information we gathered earlier in the below format.
Note: Change the numbers written below with yours. These are mine.
- address 192.168.1.72
- netmask 255.255.255.0
- network 192.168.1.0
- broadcast 192.168.1.255
- gateway 192.168.1.1
Address: This is the inet address you got from the ifconfig command. You can give any number starting with 192.168.1.xxx. The xxx can be replaced with any number. It is better you have it between 2 and 100. Choosing a higher number is recommended since a lower number may result in a clash of IP addresses, meaning two devices might have the same address.
Netmask: This is the Mask address in the ifconfig command.
Network: This is the Destination address you got from the netstat -nr command.
Broadcast: This is the Bcast address you got from the ifconfig command.
Gateway: This is the gateway address you got from the netstat -nr command.
Finally, it looks like this in my file.
Now, press Ctrl+X to save it and press Y. Then, remove the existing leashes using this command in your terminal:
sudo rm /var/lib/dhcp/*
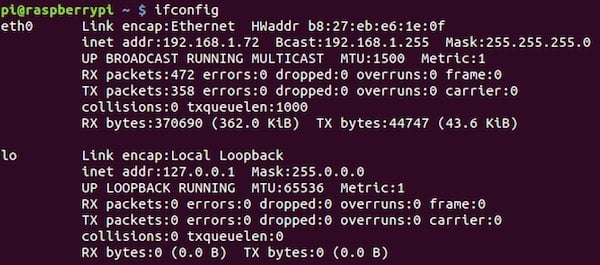
After this, you should reboot your Pi and check the ifconfig command. Remember, you can't SSH with your old IP address now, check SSH ing with the new one. In mine, ifconfig looks like this.
If the inet address shows your new IP Address, congrats! You have a static IP address.
Setting Up Port Forwarding and DDNS on Your Raspberry Pi Web Server
Now, we are going to play with our router or modem. You'll need the gateway address that you wrote down earlier. You can do this procedure on your computer or Pi. I recommend doing it on your PC. For that, open up your browser and type in the gateway number in the URL column and press Enter.
You will see either a login screen or a box come up and ask for your username and password. Sometimes, it might be there written on your modem. If not you should try guessing. Don't worry, I will give you some options:
| Username |
Password |
| admin |
admin |
| admin |
password |
| username |
password |
If this doesn't work, make it blank and click login. Or call the customer care of your modem's company.
After logging into your modem, you can see a page similar to this. This is what I see in my D-Link DSL-2750U Modem. You should also see something similar to this.
In this page, you can see a tab called "Advanced". You should now click that and select Port Fowarding.
After that, you should click "Add" in the Port Fowarding Menu and type in as shown:
Select the Service as "Web Service (HTTP)" and type in the server IP address, which is now the IP Address of your Pi. The external and internal port start and stop should be 80. After that, click "Apply". The 80 port is not forwarded to the 80 Port of your router.
Now we have to set up the DDNS, which stands for Dynamic DNS (domain name setup). We are using a site called No-IP for this. It helps us to get a URL for our router, which has forwarded the port 80. So let's create a URL for our Raspberry Pi web server!
First, we need to sign up for an account in www.no-ip.com. This service is free. You can either select a subdomain now or select one later. There are four subdomain options. You can also choose a domain by paying. But in this tutorial, I am going to show you how to get a subdomain URL for your Raspberry Pi web server.
What Dynamic DNS does is simple. I mentioned earlier that our ISP (internet service provider) gives us a random external IP address. No-IP.com changes our IP Address into a URL. We also configure this in our router, which will be shown soon. So, whenever our modem gets a new IP, it sends it to No-IP.com, and they connect the new IP Address and our static URL for our Raspberry Pi web server. The URL never changes, but the IP does.
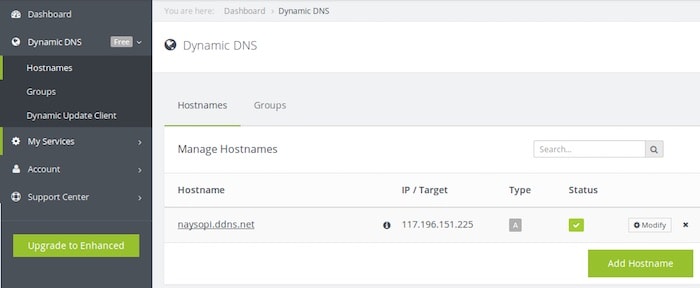
After account creation, you should activate your account using the email sent by No-IP.com. You can sign in to your account after the activation. You can see your new URL in the submenu "Hostnames" under "Dynamic DNS Menu".
You can check your URL by clicking on it. As your Raspberry Pi web server is just set up, you can see the It Works! page.
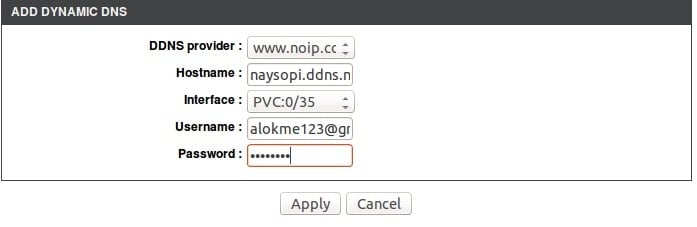
Our next step is to configure the router for No-IP.com's dynamic DNS. For that, you should again go to your router's page and log in. After logging in, you should select the "Advanced" tab again, and in that, you should find an option for "Dynamic DNS".
If it is not in the "Advanced" tab in your router, you should find it somewhere else. All the new routers have this menu. If you still can't find it, try updating your router's firmware.
Click "Add" in the Dynamic DNS Menu of your Router. Fill out the details.
Click "Apply" and there you go! Everything is done. You have your own Raspberry Pi web server. You can access it with just one URL. It's accessible to the whole world! You can make amazing websites easily using the templates available on the internet.
NaySo Technologies is my future company, so I used the name NaySoPi for my website. You can find my website running on my very own Raspberry Pi web server here: naysopi.ddns.net
Any problems? Please put them in the comments!