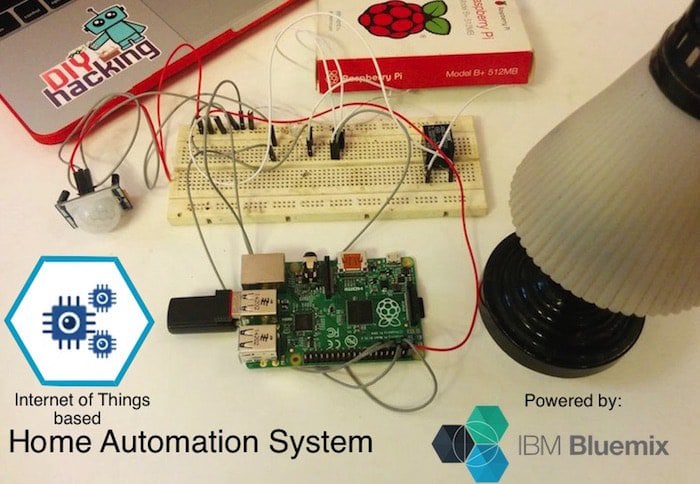
Build a simple Raspberry Pi home automation system that will allow you to control appliances in your home from anywhere.
This tutorial will show you how to build a simple Raspberry Pi home automation system that will allow you to control appliances in your home from anywhere in the world. It will also allow you to view data from the PIR motion sensor via the internet to detect intruders. This project will be using platforms like the Raspberry Pi, IBM's IoTF (Internet of Things Foundation) and Cloud (formerly Bluemix) packages and can be used as a perfect project to get into the world of the Internet of Things. So let's get started!
How Does Raspberry Pi Home Automation Work?
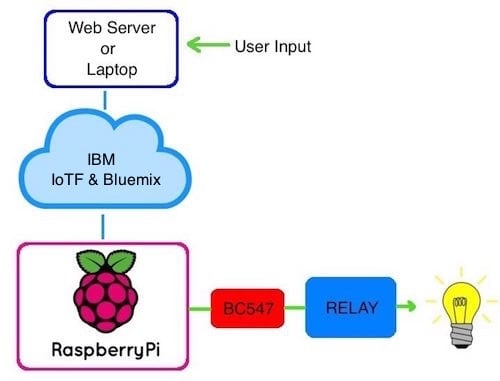
If you are a beginner to Raspberry Pi, I recommend reading this Basic Linux Commands tutorial. You can also use our free eBook to learn how to set up the Pi and the Raspbian OS. The Raspberry Pi home automation system uses client and server side python scripts. These can communicate with each other through IBM's IoTF platform. This whole Internet of Things project can be divided into two parts:
Sending Commands to the Raspberry Pi
The server side script running on our laptop or on a web server takes input commands from the user and correspondingly sends it to the client (Raspberry Pi). Here, we will be using commands to turn a light ON/OFF. When we pass the command to turn ON a light through the server side script, the information is relayed to the Raspberry Pi and its GPIO pin turns ON a relay. The system also sends status updates to the server on whether the light is ON/OFF.
Receiving Data from the Raspberry Pi
When sending data from the PIR motion sensor connected to the Raspberry Pi, we run a script which reads the sensor through a GPIO pin and broadcasts the data through the IoTF platform. This can then be viewed through the IoTF console or through a custom web application designed using the platform.
A few quick reads that will help you before you get started:
Testing the IBM IoTF With a Simulator
First, you need to sign up for a one-month free trial account from IBM: Next, you need to log into the IBM IoTF page with the credentials you just created, then you need to click on "Quickstart" from the above menu. Next, click on "Find out more" from the "Don't have a device?" section:
Then from the new window that pops up, follow the instructions to set up the simulator.
This simulator acts like the data coming from your Raspberry Pi or any other connected device, it simulates data like temperature, humidity, etc. The simulator opens up in a new tab and looks like a smartphone application:
Next, copy the MAC address from the top right corner of the simulator. In this example, it is DD:2D:36:E1:C0:17. Now, paste this MAC address on the IoTF quickstart page or just click on the MAC address itself. You can see the data coming from the simulator in this new tab in the form of a graph. Now go back to the simulator and click on the UP/DOWN arrows on it to increase/decrease the value of the temperature. You will see that the graph on the quickstart page updates accordingly, and at the bottom of the page, you will see the current value of temperature you have set.
Adding the Raspberry Pi to IBM IoTF
The next step is to add our Raspberry Pi device to the IBM IoTF platform so it can recognize it. In order to do this, you need to create a device ID for the Pi. To do that, check the instructions on this page under the heading: "Connect (Quickstart)". After installing the packages using the commands on the instructions page, find the device ID for your Pi using this command in the terminal: "service iot getdeviceid". Note down the device ID.
Next, log into the Bluemix console: and then click on "Add Service" or "Use Service".
After that, scroll down to find and select the "Internet of Things" boilerplate or icon.
Next, assign a name for this project and click "Create".
From the new page, click on "Launch Dashboard" and follow the steps below.
FYI - From next time onwards, you can just log into the IoTF page and click on the top right account section. A drop down will come up, from there you will see "My organizations". Click on the that, which will take you to a new page.
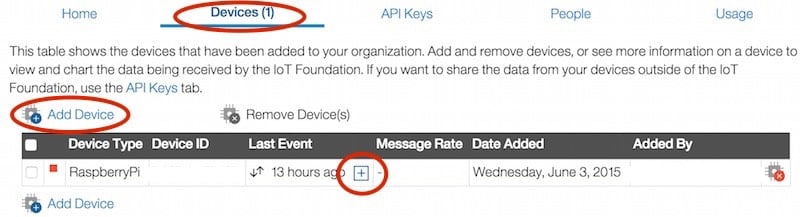
Now, after launching the dashboard, select "Devices" from the above tabs. Then click on "+Add Device" from the page. Fill in the name of your device (anything that you want to name it) and then enter the device ID you got from the earlier steps. After doing this, you will get a Token ID, please note it down or take a screenshot of the window. You will be using this Token ID to create a configuration file.
Now you can view the data coming from your Pi (CPU temperature, etc) when you enter your Pi's device ID on the quickstart page. You can also see it from the "Devices" section on your account page. Just click on the "+" symbol in the "Last Event" column to view the incoming data. Click on each of them to see the data in detail:
Next, you have to follow the steps listed under the heading: "Connect (Registered)". This will initialize your Raspberry Pi with details like Organization id, Device id, and Token so that we can communicate with it through other applications.
Getting the API Key
Now you need to create an API key for the Raspberry Pi so we can read data from it through other external applications. Click on the "API Keys" tab on your organization page and click on "New API Key". Note down the key and authentication token that is generated, this will be shown only one time, so note it down or take a picture.
Assembling the Components for the Raspberry Pi Home Automation System
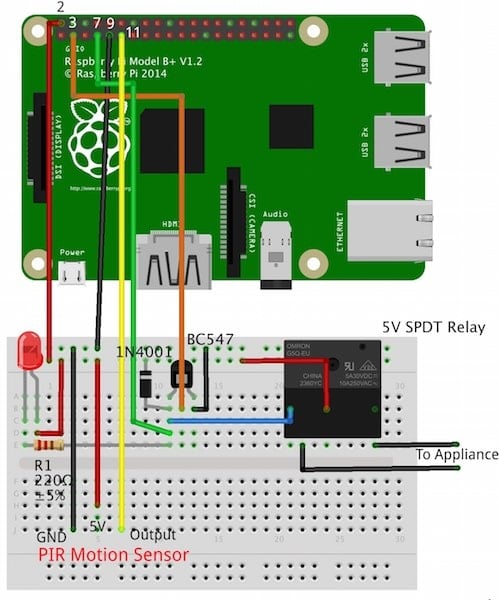
Based on the connection diagram above, connect the components for the Raspberry Pi home automation system. You can find the pin out for the BC547 transistor here. Also, check out the pin out for the Raspberry Pi here. You can connect the appliance you wish to control to the relay as shown above. One line of the light/bulb should be connected directly to power and the other line through the relay. You can use the relay guide link given above as a guide. We are mainly using three GPIO pins, which are used as follows:
- GPIO pin 3: Provides the control signal to BC547 which in turn activates the relay.
- GPIO pin 7: Monitors the status (ON/OFF) of the appliance connected to the relay.
- GPIO pin 11: Provides the status for intruder detection via the PIR motion sensor (0/1).
Setting Up the Client and Server Side Python Scripts for the Raspberry Pi Home Automation System
You can clone or download the python scripts for this project. Please note that you have to edit both of these scripts with your organization/device details. Next, log into your Raspberry Pi and open the terminal and follow these steps: cd /home/pi git clone https://github.com/DIYhacking/IoT.git
The git clone will copy the folder "IoT" from GitHub to the Pi. Next, you need to go inside that folder and edit the python script called: "client1.py". You can use the nano editor within the terminal to add the details about your organization and device type. Next, do the following commands: cd /home/pi/IoT nano client1.py
Go to the lines in the editor which ask for organization ID and device type, and fill in the details. You can view these details by using this command in a new terminal window: service iot getdeviceid
After updating your client1.py python script with all the information, we need to do the same for the server1.py script. So open your laptop and clone the code files and open the editor for server1.py and add all the details about the organization, etc just like earlier for the Pi. But, here there is additional information that needs to be filled in. You also have to fill in the details of the API key (authkey and authtoken). You can get this information from Step 3.
After performing the above steps, we need to install the python IoTF packages for running the server1.py script on the laptop/webserver. To install that, perform this command: pip install ibmiotf
You also need to check if your system has "pip" installed, if it isn't, you need to install it based on your OS.
- For Linux--> sudo apt-get install python-pip
- For Mac--> sudo easy_install pip
- For Windows--> Check this tutorial
Running and Executing the Raspberry Pi Home Automation System
Finally, we can execute the system for running our Raspberry Pi home automation project. Follow these instructions for executing and viewing the output.
First we need to stop the default IoT service running on the pi, use this command to do that: sudo service iot stop
Next, run the script on the pi using: sudo python client1.py
And then from the laptop, run the server side script: sudo python server1.py
We will be able to do two things with this system:
- See whether there are any intruders using the PIR motion sensor and check whether a light is ON/OFF from a internet connected device.
- Control an appliance/light using a remote device connected to the internet.
Checking the PIR Motion Sensor Data and Light Status Sent From the Raspberry Pi
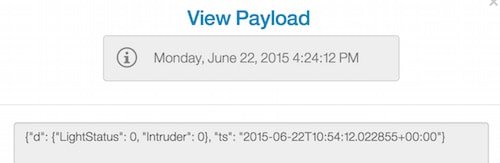
Here we are following the same steps we used in Step 2. To do this, log into your IBM IoTF account. Next, click on your account section on the top right corner and click on your organization (check out the pictures in Step2). Then, click on the "Devices" tab and next on the "+" symbol in the "Last Event" column. You will see the data being updated and on click each of those data rows, you can see the data in detail, showing the Light and Intruder status (0/1) from the Raspberry Pi home automation system:
Controlling an Appliance by Turning it ON/OFF Using the Server-Side Script
Now execute your server side python script on your laptop. You can use the command: sudo python server1.py
This script will then ask for commands, like so:
You can use two commands to control a lamp:
To turn it ON: lighton
To turn it OFF: lightoff
Type in "lighton" and hit enter, you will see that in a few seconds the relay and LED connected to the Raspberry Pi home automation system are activated. Whatever appliance you have connected to the relay will be turned ON. You will see the data generated from the Raspberry Pi like in the picture above on the terminal of your laptop.
Next, enter the command "lightoff" to disable the relay and LED and correspondingly, your appliance turns OFF.
Potentially, you can create a webpage and an HTML button and run this script when the button is clicked to control appliances through online webpages. Check out python and HTML integration to do that and you will be able to control appliances in your home from any part of the world.
So that's it guys! I hope you guys come up with really cool project ideas to make use of this powerful platform from IBM. You can post your suggestions and queries in the comments section below. Now check out a video showing a demo of the Raspberry Pi home automation system: