Learn how to connect and configure a GPS receiver to your Raspberry Pi 4 for a variety of fun projects!
Many projects require you to determine the position of your Raspberry Pi. Sometimes, you can’t use a cellular or Wi-Fi network for that task.
In this case, GPS can be a good alternative, especially if the Raspberry Pi gets used outdoors. In this article, I’ll discuss how you can connect a common GPS module to your Raspberry Pi and use the acquired data in your designs.
Connecting the GPS Receiver and Raspberry Pi
I won’t discuss the details of GPS receivers and how the entire system itself works because many other sources already do this. Let’s jump right in instead, and connect the GPS module to the Raspberry Pi!
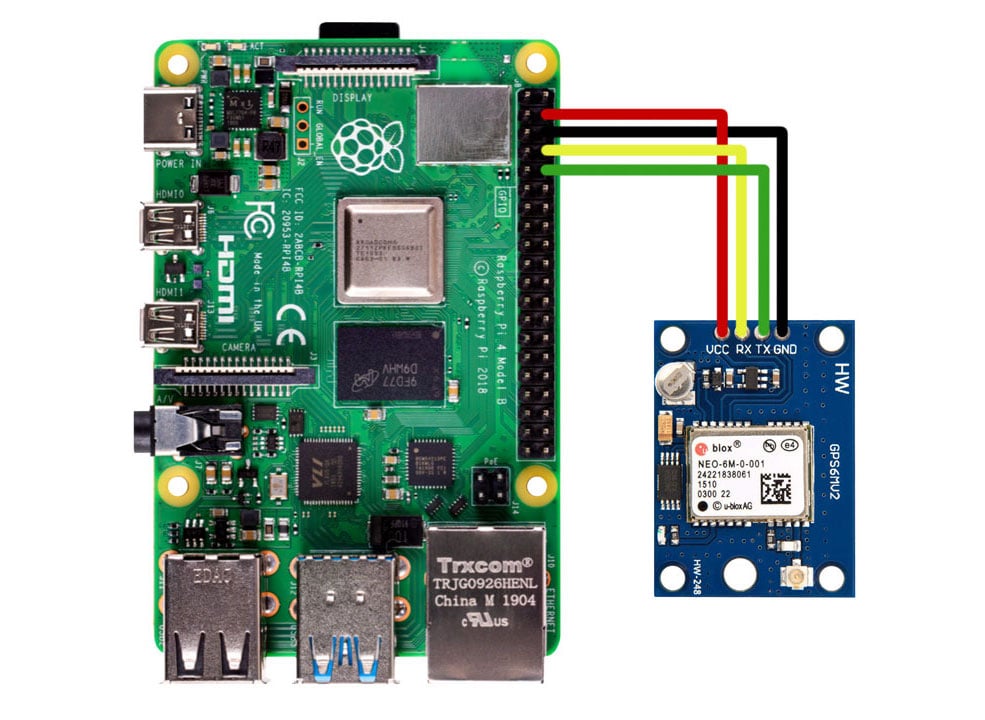
Mine uses a simple serial connection, so it has to be connected to the Raspberry Pi’s TX and RX pins:
Connections between the GPS receiver and the Pi 4.
Make sure that you attach the module’s RX input to the Raspberry Pi’s TX output and vice versa! Also note, that I connected the GPS module to the power pins of the Raspberry Pi. Make sure to use the correct voltage for your device.
Configuring the Raspberry Pi for GPS
Next, you have to configure the Raspberry Pi’s OS to be able to communicate with the GPS receiver. Note that these steps apply specifically to Raspbian Jessie or newer. They might differ for older versions.
I also recommend that you use a fresh install of the operating system to rule out any configuration problems when you first test your GPS module.
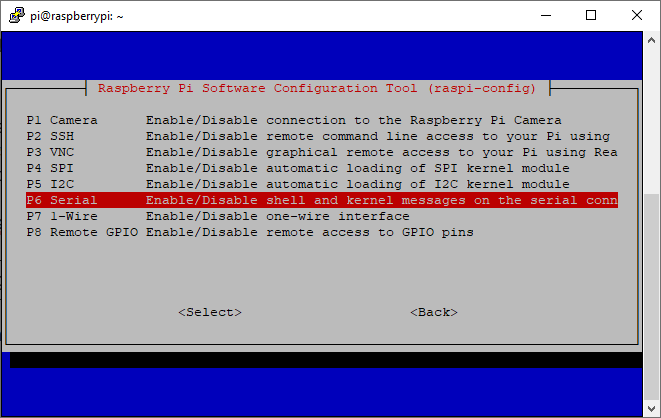
Start by running raspi-config:
You should see the following screen:
Here you have to select “Interfacing Options” and then “Serial”:
Then disable the possibility to access the login-shell via a serial connection and in the next step, choose “Yes” when you get asked whether you want the serial ports to remain enabled:
When you get brought back to the main menu of the raspi-config program, choose “Finish” and then reboot the Raspberry Pi.
Downloading the Necessary Software
Install gpsd and the gpsd-client:
sudo apt-get install gpsd gpsd-clients
gpsd is an interfacing daemon for serial GPS receivers which supports different communication standards. I’ll use it to get a test reading and verify that the hardware works correctly. For more info on the program, you can type:
Once the installation is done, verify that you can receive data from the GPS module. To do that, output the data that it sends over the serial port:
At first, the output should look something like this:
It doesn’t matter what data you receive at this point as long as you receive something. If the port closes immediately or the Pi doesn’t receive any data at all, verify that you connected the module correctly.
Note that you should be able to run this command without being a superuser. If you can’t, add the pi-user to the dialout group:
Reading the Position Data
Now it’s finally time to determine the position of the Raspberry Pi. Type the following command to stop the gpsd service that got started automatically when you installed gpsd earlier. You have to do this because the default options aren’t correct for the Pi:
sudo systemctl stop gpsd.socket
Note that you’ll have to type this command every time you boot up the system. Alternatively, you can also disable it entirely:
sudo systemctl disable gpsd.socket
Start a new gpsd instance that redirects the data of the correct serial port to a socket:
sudo gpsd /dev/serial0 -F /var/run/gpsd.sock
And then you can run either of the following two commands to display the GPS data:
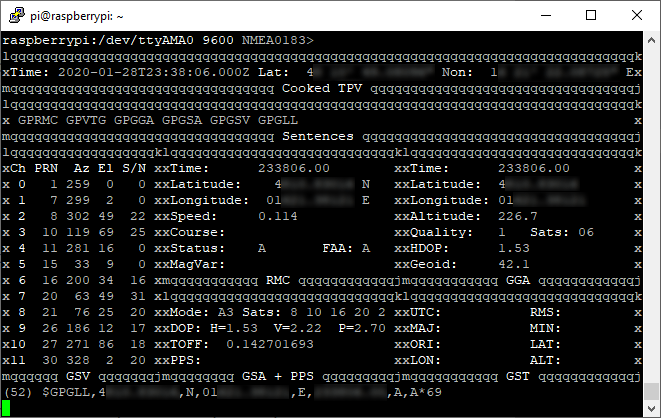
At first, you should see something like this:
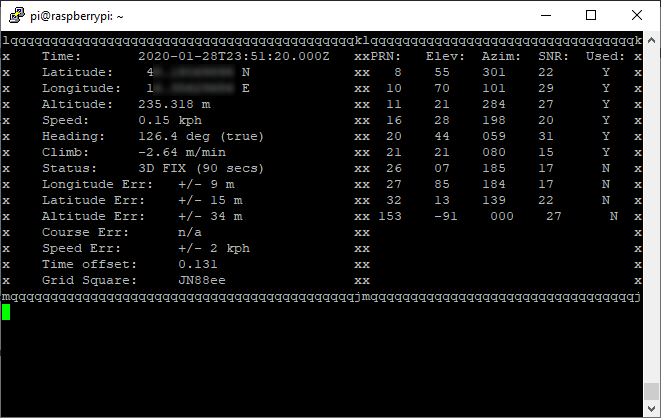
However, after a while the module should have collected enough data to display a position:
Note that it might take up to 30 minutes until the module can determine your position when you first boot it up, especially if you are indoors. Try to point the antenna at a window or, even better, place the entire module next to a window or outdoors.
Try the following command if you get an error when you run gpsmon and no output when you run cgps:
Then you should be able to use gpsmon as well:
Raspberry Pi GPS Projects
Once you got the GPS receiver up and running, it’s time to build interesting projects that utilize it! Here are a few examples to spark your creativity:
Locating your Raspberry Pi via GPS can be useful in a wide variety of applications and many different projects. GPS modules are usually quite cheap and very easy to set up. However, the cheap devices usually require a long time to collect enough data and the reception can be poor, especially indoors. Therefore, it mainly makes sense to use such devices outdoors.