Learn how to enable SSH Wi-Fi Setup on your Raspberry Pi 4 with PuTTY and the command line.
Setting up Secure Shell (SSH) on your Raspberry Pi is a very convenient way to work with Wi-Fi, especially if you can’t always have a monitor nearby. Not only is it convenient, but it provides a secure remote connection between your Pi and desktop computer, allowing remote control through the command line even in unsecured networks. Even better, this incredibly useful feature is simple to set up.
In this article, you will learn what software is needed on your desktop computer, and how to enable SSH on your Pi 4.
Downloading PuTTY
The free and open-source PuTTY application supports many different network protocols, but we will focus on its SSH feature. Though originally written for Windows, it now supports macOS and most Linux distros. Download link for PuTTY.
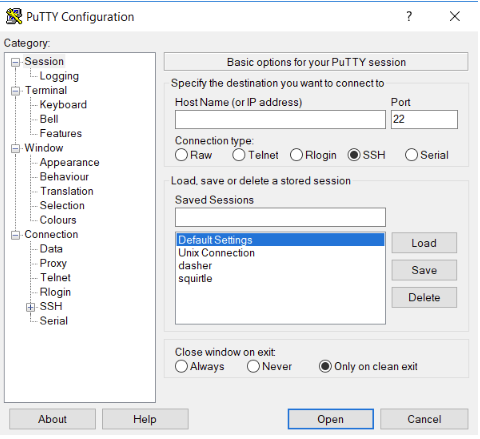
Once downloaded and installed, open up PuTTY. You should see something similar to the image below (minus my saved sessions).
Type in 22 (the standard port for SSH) in the “Port” blank, and select SSH.
Now you will need some information from your Pi, but don’t close out of the application yet. Below I will give two sets of instructions depending on how you want to set it up. I will be assuming that your Pi has already been connected to your Wi-Fi network. Feel free to skip the one that is not applicable.
Enabling SSH with the GUI
If you are new to the world of Pi, you might have the full desktop version of Raspbian. This simply means you have an actual desktop screen where you can drag around icons and click things.
Enabling SSH, however, is as easy as can be. Simply click the Raspberry Pi logo at the top left (by default) of your screen to open the drop-down menu. Scroll down to the bottom and open the Raspberry Pi configuration tool. Once that is opened, you will find an SSH option that is off by default. Enable and save, but do not restart yet. We need one more piece of information first.
Open up the command line, or terminal, and type the command “hostname -I” (Note: this is with a capital "I", not a lowercase "L") then enter this information in PuTTY. This will give you your Pi’s IP address. Enter the IP address in PuTTY and restart your Pi for the configuration settings to take effect. Now you are ready to connect!
Enabling SSH From the Command Line
Just like the Desktop version, enabling SSH is simple through the command line. After opening Terminal, enter “sudo raspi-config” to open the Pi Configuration Tool. Use the arrow keys to select “Advanced Options”, and then select SSH. After enabling it, you will need to find your Pi’s IP address. Type in “hostname - I” then enter this information in PuTTY.
Connecting
Once all of the information is entered in PuTTY, save the session to avoid typing it again later, then Open the connection. You should see a console window open up and will be prompted to log in. If you have not changed this (you should), the username is “pi” and the password is “raspberry”. Once logged in, you should see something similar to the image below.
That’s all there is to it!
Utilizing SSH for Raspberry Pi