Utilize the Wekinator DTW Mouse Explorer application and test its control using Arduino and DC motors.
This article is a guide on how to use the Dynamic Time Warping (DTW) Mouse Explorer feature in the Wekinator software platform to control motors connected to an Arduino Uno.
The DTW Mouse Explorer is an application that is primarily used in Processing, where it can perform different gestures. The application examines data retracted from a sensor over a period of time and recognizes when an assigned gesture occurs.
To learn more about the Dynamic Time Warping algorithm, take a look at our article, How to Program Dynamic Time Warping With Machine Learning.
In this project, we'll be adapting the default function of the Mouse Explorer application to send 2 inputs to Wekinator and accept 1 DTW output with up to 9 classes.
In the first example, 1 DTW output will be used with 4 classes as well as sending X and Y input values.
In this project, four gestures will be recorded in the Mouse Explorer application and the Wekinator will be trained according to them. Then Wekinator should set the application into 'Run' mode and redraw the gestures.
Wekinator will recognize the gestures and send output back to Processing, which will forward the data to the Arduino Uno in order to control the motors (in this case the L298N Motor).
Processing Sketch
The DTW Mouse Explorer application file can be downloaded on the Wekinator website.
It will provide 2 inputs and accept 1 DTW output.
The sketch was modified for the purpose of sending the output value from Wekinator to the Arduino Uno to control the motors.
You can find the sketch details below.
Processing Code
Run the code in Processing and check the window below for an example of how it should display.
Example of how Processing window should appear with processing sketch uploaded.
Arduino Instructions
The Processing sketch will send the trained output from the Wekinator to Arduino in order to control the motors accordingly.
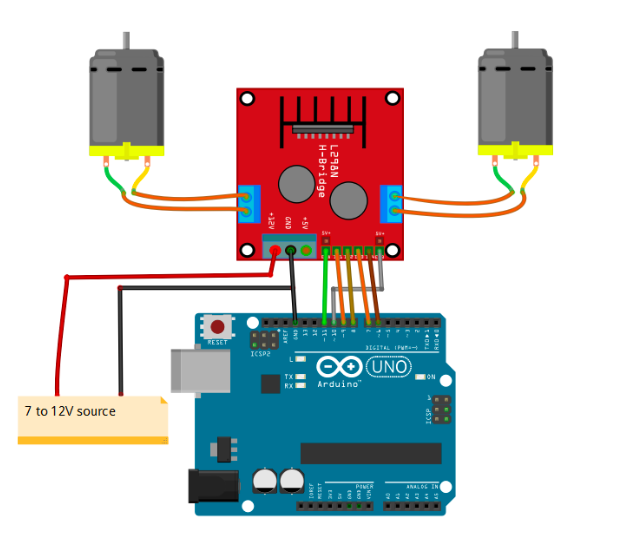
At this point, make the connections as shown in the figure below.
A diagram of how to connect the motors with the Arduino Uno.
When using Wekinator in this project, we'll set it up to receive 2 input values and 1 output to the Mouse Explorer application.
To do so, launch Wekinator then set the inputs to 2 and outputs to 1.
Leave the output type as the default 'All Dynamic Warping' setting and arrange it for 4 classes.
Note: It can be set to a total of 9 classes.
Wekinator 'Create New Project' window displaying where to insert Input and Output values.
Now, select the 'Next' button and a new window will appear.
Wekinator New Project window with output fields.
At this point in the project, we'll be assigning 4 different gestures in the Mouse Explorer application.
- Open the processing window and press the '1' key on your keyboard. The first class will be selected and enable us to draw the vertical line as output 1.
- Select '2' on your keyboard in order to draw a horizontal line for output 2.
- Move on to pressing '3' on your keyboard and draw a curved line for output 3.
- Lastly, press the '4' key to designate it as class 4 and draw a circle for its output.
After recording the four gestures, it's time to train the Wekinator and run the program.
Click on the 'Run' button and...success! the program should be looking for the recorded gestures.
The DTW Mouse Explorer Processing window with Record/Run button circled.
When you draw the gestures in the Processing window, the Wekinator will match these to the recorded gestures and send the output to Processing.
Processing will then send the output to the Arduino Uno, which will control the motors according to the data.