Build your own Infrared Thermometer using the MLX90614 and Arduino.
In this article, I will explain how can we measure the temperature of a surface via infrared. Using this technology, we can collect temperature information simply by sending an infrared wave to the surface and analyzing the wave that returns back to the sensor.
There are many different types of sensors available to measure temperature. The LM35 or DS18B20 temperature sensors give an output depending on the heat applied directly to the surface of the sensor device. However, for extremely hot scenarios (such as an open flame) you can’t use contact-based sensors to detect accurate temperature.
If you want to detect the temperature in the non-contact method (which we do for this project), an infrared thermometer sensor is the best solution. As such, we will use the MLX90614 infrared thermometer from Melexis for this project. The MLX90614 sensor uses non-contact temperature sensing to collect the temperature info without touching any particular surface.
How an Infrared Thermometer Works
Although not visible to the human eye, all objects emit infrared light rays and the concentration varies depending on temperature. By detecting the IR rays, we can perceive the temperature range. The MLX90614 thermometer sensor works using this principle.
MLX90614 is a powerful infrared sensing device with a very low noise amplifier and a 17-bit ADC. It enables high accuracy and resolution for the thermometer. The best part about the MLX90614 is it comes calibrated with a digital SMBus from the factory. This means that it will give an output with a high resolution of 0.02°C and can continuously transfer the measured temperature in the range of -20 to 120°C.
Now that we understand how the sensor works, let’s dive into the project!
Required Materials
- Arduino
- Character LCD 16x2
- MLX90614
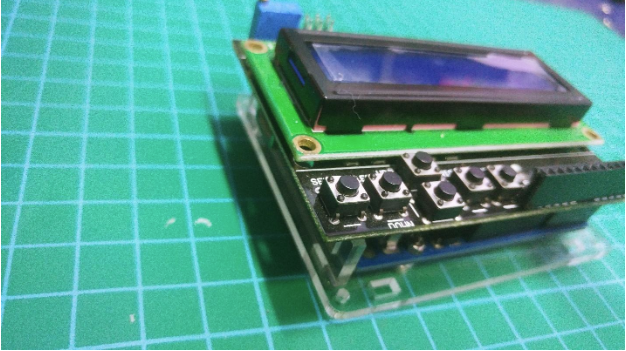
- LCD shield (optional)
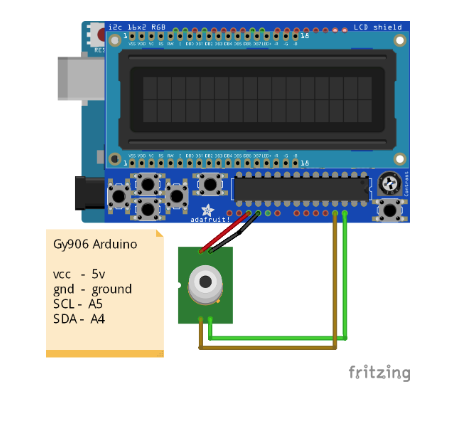
Wiring
The MLX 90614 thermometer has I2C communication lines, so we can interface this sensor with Arduino without any additional circuits. Wire up everything as shown below. You can either use the LCD 16X2 shield or attach a standalone LCD as described in the Fritzing diagram.
For Arduino LCD Shield
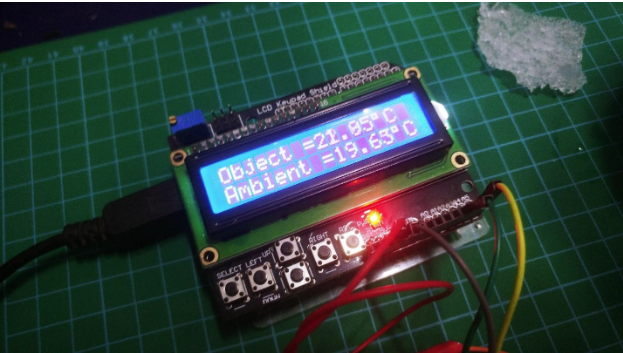
Copy and paste the source code below into Arduino IDE. After double-checking your connections, upload the code.
/*
* Non-contact Thermometer with GY - 906 module
* Support for the MLX90614 sensor on the I2C bus
* SDA line = A4
* SCL line = A5
* Sensor supply with 5V
*/


#include <i2cmaster.h>
#include <LiquidCrystal.h>


LiquidCrystal lcd (8, 9, 4, 5, 6, 7);

int address = 0xb4; // Sensor address MLX90614
int erc = 0; // Variable holding the PEC value
int dataH = 0; // The second byte of data
int dataL = 0; // The first byte of data
double tempnalsb = 0.02; // Variable by which the digital value will be multiplied
double temperature = 0; // Variable holding the temperature


void setup () {
  i2c_init (); // Initialization of the I2C bus
  lcd.begin (16, 2); // Initialize the display


}


void loop () {

  i2c_start_wait (address + I2C_WRITE); // Start I2C communication in write mode
  i2c_write (0x07); // Write the value 0x07 (select the register Tobj1)
  i2c_rep_start (address + I2C_READ); // Restart I2C communication at the read address
  dataL = i2c_readAck (); // Read the first byte of data
  dataH = i2c_readAck (); // Read the second byte of data
  erc = i2c_readNak (); // Read the third (unimportant) data byte
  i2c_stop (); // End of I2C transmission


  temperature = (double) (((dataH & 0x007F) << 8) + dataL); // Create a 16-bit variable consisting of two one-byte variables
  temperature = temperature * tempnalsb; // For one bit 0.02 K, the result of this operation is the temperature in Kelvin

  temperature = temperature - 273.15; // Conversion to Celsius degrees

  lcd.setCursor (0,0); // Display (first LCD line)
  lcd.print ("Object =");
  lcd.print (temperature);
  lcd.print ("");
  lcd.write (0xDF); // Degree sign
  lcd.print ("C");

  i2c_start_wait (address + I2C_WRITE);
  i2c_write (0x06); // Select the ambient temperature register
  i2c_rep_start (address + I2C_READ);
  dataL = i2c_readAck ();
  dataH = i2c_readAck ();
  erc = i2c_readNak ();
  i2c_stop ();


  temperature = (double) (((dataH & 0x007F) << 8) + dataL);
  temperature = temperature * tempnalsb;
  temperature = temperature - 273.15;

  lcd.setCursor(0,1); // Display (second LCD line)
  lcd.print ("Ambient =");
  lcd.print (temperature);
  lcd.print ("");
  lcd.write (0xDF);
  lcd.print ("C");

delay (200); // Delay 200ms
}
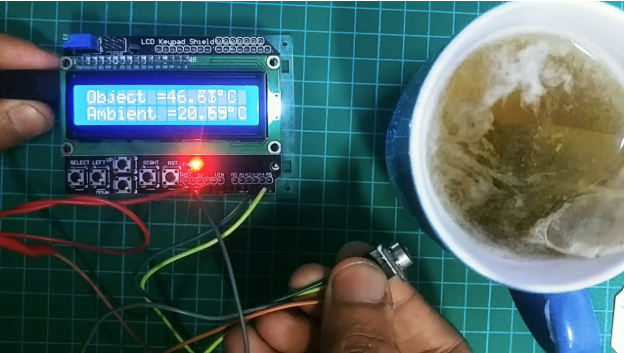
There are a lot of projects where an infrared temperature sensor can come in handy, such as for measuring liquids or hot-to-touch surfaces. Because it doesn’t require direct contact, the MLX90614 will be a great choice in those scenarios.