Learn how to make an RFID door lock powered by an Arduino and solenoid engine.
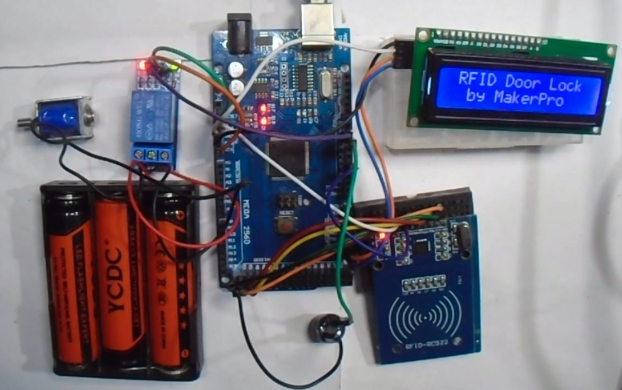
This project guide will detail the steps to create an RFID (radio frequency identification) door lock system using an Arduino Mega 2560.
The goal is to open a door by using a specific tag that functions as an access badge. If the wrong tag is scanned, the door will stay closed and set off a buzzer.
To control the door lock, we'll be using a relay module interfaced with an Arduino which controls a solenoid engine.
Required Components
- Arduino Mega 2560
- I2C LCD Display
- RC522 RFID Reader Module
- Single-channel relay module
- Solenoid Lock
- 3X 18650 cells
- Door Buzzer
- Jumper Cables
Circuit Diagram and Explanation
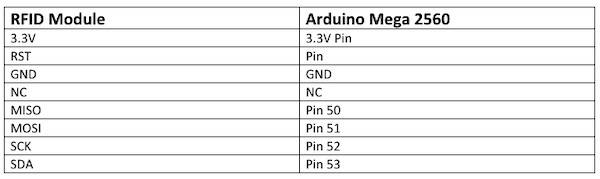
The first step is to connect the RC522 RFID reader module to the Arduino.
To correctly link the module and Arduino, follow the instructions below.
Instructions for connecting the RFID module to the Arduino Mega 2560.
Next, connect the I2C LCD module.
Instructions for connecting the I2C LCD module and Arduino Mega 2560.
Afterwards, connect the relay module and door buzzer to the Arduino.
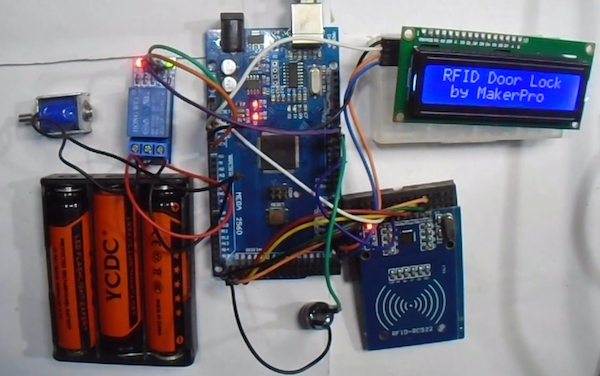
Take a look at the image reference below on connecting the module, buzzer and Arduino.
Note: This project used three 18650 cells to power the door lock mechanism.
Image showing how to connect the relay module, door buzzer and Arduino.
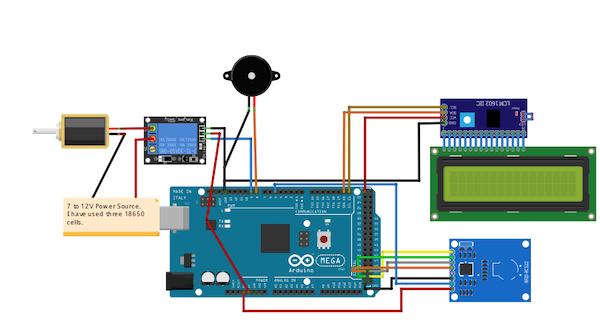
A circuit diagram is available to reference as well.
Circuit diagram of the connected relay module, door buzzer and Arduino Mega 2560.
Code Explanation
We start by including the libraries for the LCD and RFID reader.
The MFRC522 module works with the Arduino using SPI communication, so we'll also need to include the SPI library.
#include <LiquidCrystal_I2C.h>
#include <SPI.h>
#include <MFRC522.h>
In the setup function, start the communication protocols.
lcd.begin();   // LCD screen
  SPI.begin();      // Init SPI bus
  mfrc522.PCD_Init();   // Init MFRC522
Through the loop, the program will first check to see if a new tag is placed near the reader.
If it does find a new tag, it will continue the loop. Otherwise, it will continue looking for one.
Once the new tag is placed, it will be read, then the 4 byte UID number associated with it, stored.
Note: The string will also be set to uppercase.
// Look for new cards
  if ( ! mfrc522.PICC_IsNewCardPresent()) {
    return;
  }

  // Select one of the cards
  if ( ! mfrc522.PICC_ReadCardSerial()) {
    return;
  }

  //Reading from the card
  String tag = "";
  for (byte i = 0; i < mfrc522.uid.size; i++)
  {
    tag.concat(String(mfrc522.uid.uidByte[i] < 0x10 ? " 0" : " "));
    tag.concat(String(mfrc522.uid.uidByte[i], HEX));
  }
  tag.toUpperCase();
Next, check whether the 4 byte UID number matches with the one saved.
If it matches the door will open, if not, the door will remain closed.
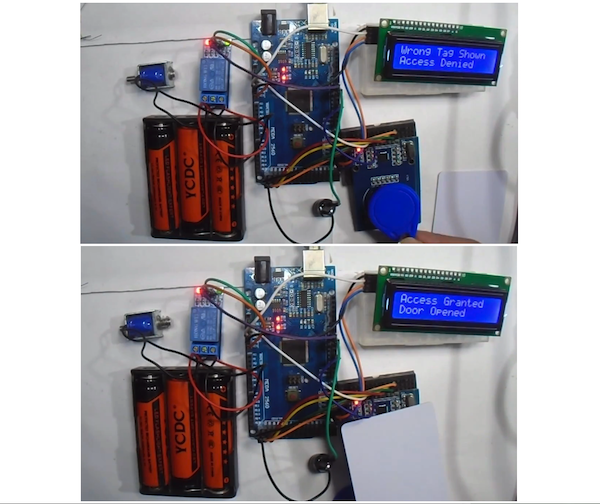
Example images of the lock accepting a tag and denying a tag.
//Checking the card
  if (tag.substring(1) == "29 B9 ED 23") //change here the UID of the card/cards that you want to give access
  {
    lcd.clear();
    lcd.setCursor(0, 0);
    lcd.print("Access Granted");
    lcd.setCursor(0, 1);
    lcd.print("Door Opened");
    digitalWrite(relayPin, HIGH);
    delay(3000);
    digitalWrite(relayPin, LOW);
    lcd.clear();
  }

  else
  {
    lcd.clear();
    lcd.setCursor(0, 0);
    lcd.print("Wrong Tag Shown");
    lcd.setCursor(0, 1);
    lcd.print("Access Denied");
    digitalWrite(buzzerPin, HIGH);
    delay(3000);
    digitalWrite(buzzerPin, LOW);
    lcd.clear();
Final Full Project Code
In the final code, enter the tag's UID number. If you don't know it, upload the 'dumpinfo' examples from the library and find it there.
Arduino Code
#include <LiquidCrystal_I2C.h>
#include <SPI.h>
#include <MFRC522.h>

constexpr uint8_t RST_PIN = 5;
constexpr uint8_t SS_PIN = 53;

LiquidCrystal_I2C lcd(0x27, 16, 2); //Parameters: (rs, enable, d4, d5, d6, d7)
MFRC522 mfrc522(SS_PIN, RST_PIN);  // Create MFRC522 instance

int buzzerPin = 8;
int relayPin = 9;

void setup() {
  pinMode(buzzerPin, OUTPUT);
  pinMode(relayPin, OUTPUT);
  digitalWrite(relayPin, LOW);

  lcd.begin();   // LCD screen
  SPI.begin();      // Init SPI bus
  mfrc522.PCD_Init();   // Init MFRC522

  lcd.setCursor(0, 0);
  lcd.print(" RFID Door Lock");
  lcd.setCursor(0, 1);
  lcd.print("  by MakerPro");
  delay(3000);

  lcd.clear();
}

void loop() {
  lcd.setCursor(0, 0);
  lcd.print(" RFID Door Lock");
  lcd.setCursor(0, 1);
  lcd.print(" Show Your Tag ");

  // Look for new cards
  if ( ! mfrc522.PICC_IsNewCardPresent()) {
    return;
  }

  // Select one of the cards
  if ( ! mfrc522.PICC_ReadCardSerial()) {
    return;
  }

  //Reading from the card
  String tag = "";
  for (byte i = 0; i < mfrc522.uid.size; i++)
  {
    tag.concat(String(mfrc522.uid.uidByte[i] < 0x10 ? " 0" : " "));
    tag.concat(String(mfrc522.uid.uidByte[i], HEX));
  }
  tag.toUpperCase();

  //Checking the card
  if (tag.substring(1) == "29 B9 ED 23") //change here the UID of the card/cards that you want to give access
  {
    lcd.clear();
    lcd.setCursor(0, 0);
    lcd.print("Access Granted");
    lcd.setCursor(0, 1);
    lcd.print("Door Opened");
    digitalWrite(relayPin, HIGH);
    delay(3000);
    digitalWrite(relayPin, LOW);
    lcd.clear();
  }

  else
  {
    lcd.clear();
    lcd.setCursor(0, 0);
    lcd.print("Wrong Tag Shown");
    lcd.setCursor(0, 1);
    lcd.print("Access Denied");
    digitalWrite(buzzerPin, HIGH);
    delay(3000);
    digitalWrite(buzzerPin, LOW);
    lcd.clear();
  }
}