Learn how to program an ATtiny85 microcontroller with an Arduino UNO.
Atmel Corporation's (acquired by Microchip Technology) ATtiny85 chip is capable of creating an Arduino the size of a tiny nut.
The ATtiny85 acts as a cheap and powerful alternative to other Arduino microcontrollers—especially when you want to minimize your use of PWM pins. For a more in-depth view of this product's features, take a look at its datasheet on the Microchip website.
Since the ATtiny85 is just a microcontroller, it requires an ISP to be programmed. In order to do this, we'll need to program an Arduino Uno to act like a real ISP.
This article will walk you through the programming process and result in enabling a smaller Arduino to be used in projects.
Arduino UNO as an ISP (In-System Programming)
To program the ATtiny85, we start by setting up the Arduino UNO as an ISP. This is to ensure that when we start the upload process the Arduino IDE detects the Arduino UNO in ISP mode.
Start by connecting the Arduino UNO to your PC.
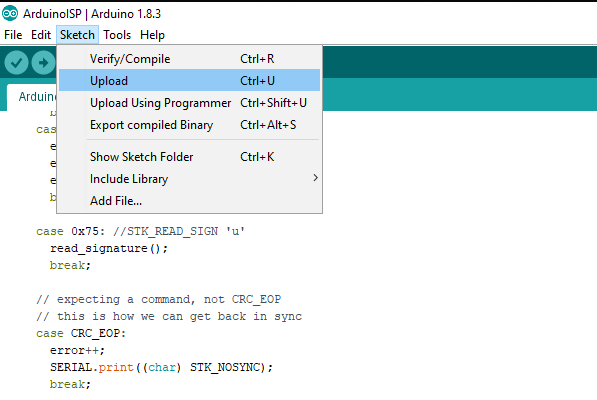
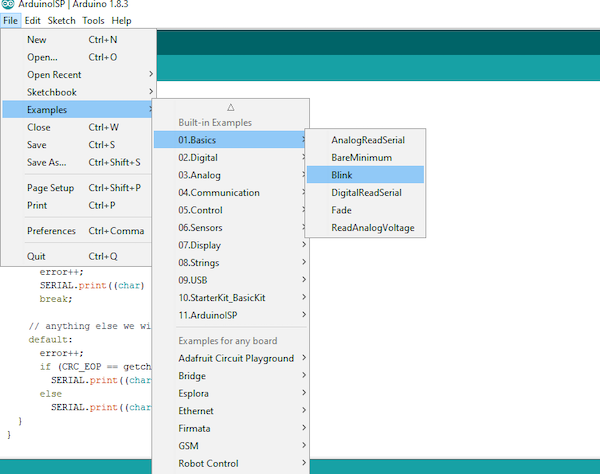
Start up the Arduino IDE software, then open the 'ArduinoISP' example file.
Navigate to File > Example > ArduinoISP.
Hardware Requirements
- Arduino UNO
- ATtiny85
- Breadboard
- Jumper Wires
- LED
- 220 ohm resistor
The hardware required for this project: an Arduino Uno, ATtiny85, Breadboard, jumper wires, an LED, and a 220 ohm resistor.
The specific placement of the ATtiny85 on the breadboard.
Connecting the ATtiny85 to the Arduino UNO
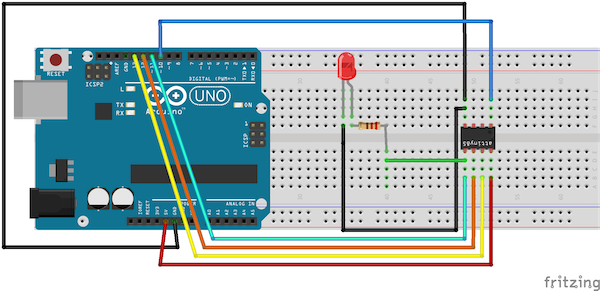
To program the ATtiny85, we'll be connecting the breadboard to link it to the Arduino UNO as shown in the diagram below.
- 5V - Vcc
- Gnd - Gnd
- Pin 13 - Pin 2
- Pin 12 - Pin 1
- Pin 11 - Pin 0
- Pin 10 - Reset
A schematic of the ATTiny85 connected to the Arduino UNO through a breadboard.
Software Configuration
Start by selecting the Arduino UNO board and upload the Arduino ISP example code under the 'Examples' category in the 'File' menu.
Adding the Core Files
The Arduino IDE doesn't support the ATtiny85 by default. So, we'll also need to add it's board to the Arduino IDE.
You'll find it under File > Preferences.
In the 'Add-on Manager URL' field, enter the GitHub code below.
{
  "packages": [
    {
      "name": "attiny",
      "maintainer": "David A. Mellis",
      "websiteURL": "https://github.com/damellis/attiny",
      "email": "",
      "help": {
        "online": ""
      },
      "platforms": [
        {
          "name": "attiny",
          "architecture": "avr",
          "version": "1.0.0",
          "category": "attiny",
          "help": {
            "online": ""
          },
          "url": "https://github.com/damellis/attiny/archive/702aa287455f7e052cf94fd4949398fec0ef21b8.zip",
          "archiveFileName": "702aa287455f7e052cf94fd4949398fec0ef21b8.zip",
          "checksum": "SHA-256:bfffa4a700e42ae993895f5eea22bc369ba5ac3ea36eca18ac5f72a05bb60ab5",
          "size": "5005",
          "boards": [
            {"name": "ATtiny45"},
            {"name": "ATtiny85"},
            {"name": "ATtiny44"},
            {"name": "ATtiny84"}
          ],
          "toolsDependencies": [
            {
              "packager": "arduino",
              "name": "avr-gcc",
              "version": "4.8.1-arduino5"
            },
            {
              "packager": "arduino",
              "name": "avrdude",
              "version": "6.0.1-arduino5"
            }
          ]
        },
        {
          "name": "attiny",
          "architecture": "avr",
          "version": "1.0.1",
          "category": "attiny",
          "help": {
            "online": ""
          },
          "url": "https://github.com/damellis/attiny/archive/76ca88ce3c195fcba8e8a645084e352965dc80e0.zip",
          "archiveFileName": "76ca88ce3c195fcba8e8a645084e352965dc80e0.zip",
          "checksum": "SHA-256:49a4dfc3796caf2533050b0b962ae0affb2471b8ded1283936d7b712cc1fdff1",
          "size": "5719",
          "boards": [
            {"name": "ATtiny45"},
            {"name": "ATtiny85"},
            {"name": "ATtiny44"},
            {"name": "ATtiny84"}
          ],
          "toolsDependencies": [
            {
              "packager": "arduino",
              "name": "avr-gcc",
              "version": "4.8.1-arduino5"
            },
            {
              "packager": "arduino",
              "name": "avrdude",
              "version": "6.0.1-arduino5"
            }
          ]
        },
        {
          "name": "attiny",
          "architecture": "avr",
          "version": "1.0.2",
          "category": "attiny",
          "help": {
            "online": ""
          },
          "url": "https://github.com/damellis/attiny/archive/6bba7d452af59d5190025bc870ec9e53d170e4d9.zip",
          "archiveFileName": "6bba7d452af59d5190025bc870ec9e53d170e4d9.zip",
          "checksum": "SHA-256:1654a8968fea7d599255bd18430786f9c84340606e7a678b9cf9a3cd49d94ad7",
          "size": "5913",
          "boards": [
            {"name": "ATtiny25"},
            {"name": "ATtiny45"},
            {"name": "ATtiny85"},
            {"name": "ATtiny24"},
            {"name": "ATtiny44"},
            {"name": "ATtiny84"}
          ]
        }
      ],
      "tools": []
    }
  ]
}
Afterwards, go under Tools > Board > Board Manager.
Search for the 'Attiny by David.A halls' file and install the latest version.
After installing the file, you should see a new entry in the board menu titled 'Attiny25/45/85'.
Navigate to the file under 'Tools' and select your chip's processor type.
Now, open the Blink example that's found under File > Examples > Basics.
Change the pin number on there from 13 to 0.
Then, go ahead and upload it.
Connecting the LED to the Resistor
In order to confirm the project was successful, an LED will be connected to a resistor.
First, connect a 22-ohm resistor to pin 5.
Next, connect the LED between the resistor and +5V.
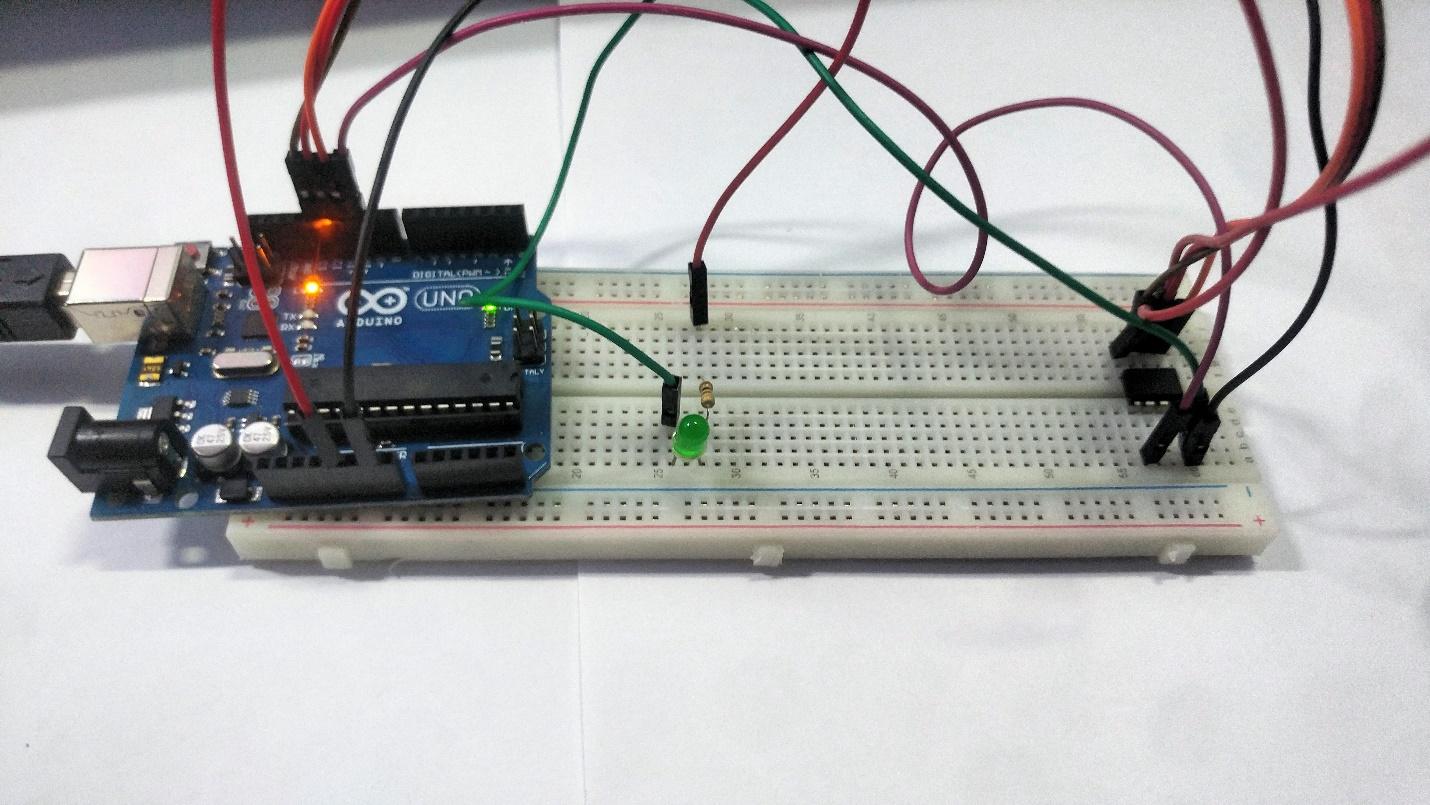
If the LED blinks, take it as confirmation that the code was uploaded correctly. Congratulations! You now have a smaller Arduino to use in your projects.
An example of the LED blinking to confirm the code was uploaded correctly.
An example of the LED not blinking and showing that the code wasn't uploaded properly.