Build a robot you can control with your Android phone — no Android programming experience required.
Ever wanted to make an Android controlled robot or car? Control your RC car with a smartphone? Or wanted a tutorial about connected devices and getting started with it? Now you can do that with this simple DIY hack that even provides you with a free Android application, thus it doesn't require you to have any experience in Android application programming. Download the free application to your phone and start controlling your robot. Have fun with this DIY hacking tutorial!
How Does the Android-Controlled Robot Work?
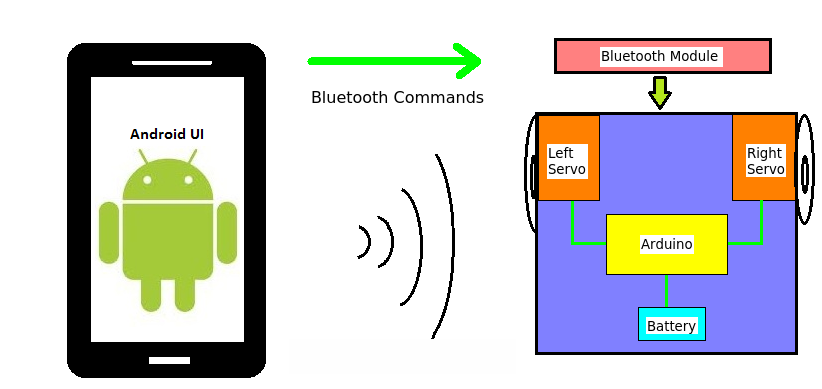
The Android application controlled robot communicates via Bluetooth to the Bluetooth module present on the robot. While pressing each button on the application, corresponding commands are sent via Bluetooth to the robot. The commands that are sent are in the form of ASCII. The Arduino on the robot then checks the command received with its previously defined commands and controls the servo motors depending on the command received to cause it to move forward, backward, left, right or to stop. Thus allowing us to create an Android controlled robot. Basic block diagram:
Assembling the Components for the Android Controlled Robot
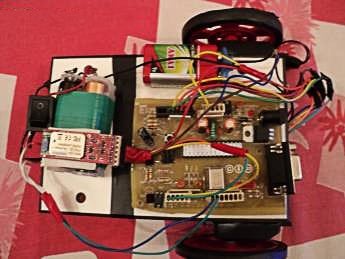
Take the piece of acrylic board and stick the servo motors to the left and right edges using hot glue/super glue. Then attach the ball caster. On the top side, stick the Arduino board using double sided tape, do the same for the battery holder. This is how it looks:
Android-Controlled Robot Base with Servos
Complete Android-Controlled Robot
Setting Up the Connections for the Android-Controlled Robot
Setup the hardware connections with the Arduino and the servo motors. The continuous rotation servo motors are those kinds of servo motors that cannot be controlled or set at a particular angle, unlike normal servos. Servos have three wires coming from them: Red- Power, Black -Ground, White/Yellow- PWM /PPM Signal. The left servo motor (white/yellow wire) is hooked up to Arduino digital pin 9 and the right servo motor (white/yellow wire) Arduino digital pin 10. The black wires of both the motors are connected to Arduino GND and the Red wires to the positive terminal of the battery holder. Connect the RX pin of the Bluetooth module to TX pin (digital pin 1) on the Arduino and the TX pin on the module to the RX pin on the Arduino (pin 0). Connect Vcc and Gnd of the module to the Arduino. Connect the negative terminal of the battery holder to Arduino GND. The connections will look like this:
Wiring Diagram for the Arduino Android-Controlled Robot
Loading the Arduino Software for the Android-Controlled Robot
If you are new to Arduino, download the
Arduino IDE (Integrated Development Environment) from Arduino. Download the
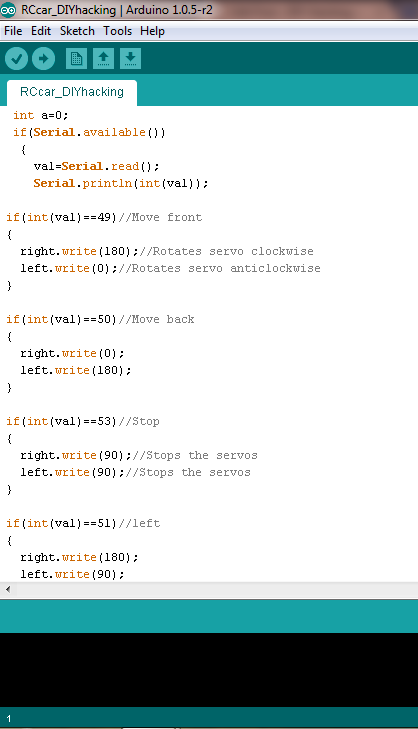
Arduino code for the project. Upload the code to the Arduino. PLEASE NOTE: SINCE THE BLUETOOTH MODULE IS CONNECTED TO THE RX AND TX PINS OF THE ARDUINO, THE MODULE SHOULD BE REMOVED WHILE UPLOADING THE CODE FROM YOUR PC TO THE ARDUINO. THE MODULE SHOULD BE CONNECTED ONCE THE UPLOAD IS COMPLETE. The code uses the
Arduino servo library and simple commands. Servo is controlled using commands like: servo.write(90) -> stops the servo, servo.write(180) ->rotates servo clockwise and servo.write(0)-> rotates servo anti-clockwise. Screenshot of the Arduino code:
Downloading the Android Application and Setting Up Bluetooth
To download the Android application to your phone, copy this .apk file to your phone from the PC and then click on it from the phone to install it:
DIY RC car. For those who wish to modify the application, I am attaching the project file here:
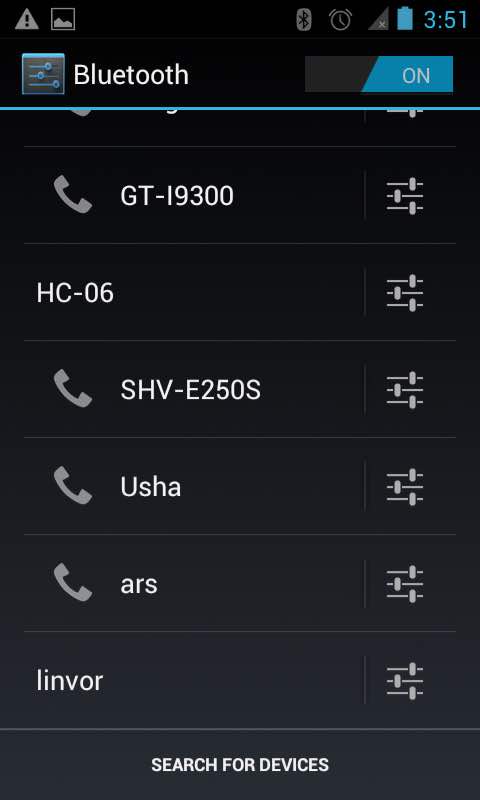
DIY RC car project. Be sure, to check "Allow installation of non-Market apps" in the Security tab under settings. Once you have installed the application, before opening it, you need to pair and connect with your Bluetooth module. For this, you need to power the Arduino and Bluetooth module and then turn ON the Bluetooth of your phone and make it visible to other devices. After that, search for new devices in Bluetooth, select your Bluetooth module from the list, enter the pairing code when prompted, it is usually '1234' or '0000'.
Discovering New Bluetooth Devices
Note the name of your device, in this case, it is "HC-06". After pairing with the robot, go to the "DIY RC car" application and enter the name of your Bluetooth module you noted earlier (case-sensitive) and click "OK". After that, the phone will get connected to your robot, and on clicking the respective buttons, the robot will move accordingly.
The demo video of the Android controlled robot in action, please mind the application UI as it was a previous version, check it out and have fun with your Android controlled robot!