Learn how to use Tinkercad's newest feature, Codeblocks, to easily create intricate 3D designs.
Tinkercad Codeblocks, released in June 2018 and recently out of beta, allows you to procedurally generate shapes using visual programming.
This article will introduce you to the basics of using Codeblocks, which is particularly useful when creating shapes that could take a long time to manually build, such as snowflakes, pillars, plants, and decorative ornaments. After we cover the basics, I'll walk you through a simple build to show you what Codeblocks is capable of.
Even though it’s not necessary for this tool, I strongly recommend that you get familiar with the basics of Tinkercad before starting to use Codeblocks.
**Note: Tinkercad Codeblocks is not related to the open-source cross-platform IDE Code::blocks.
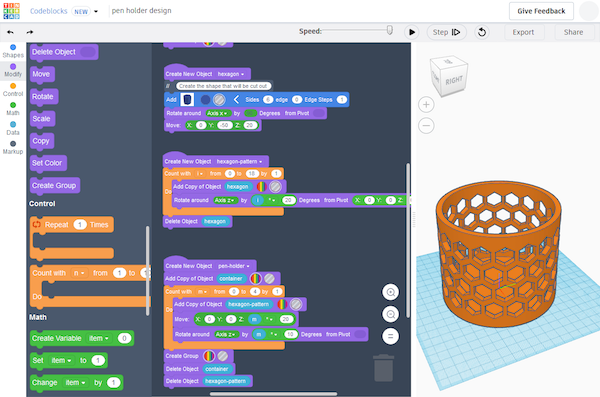
An example of what kind of design you can easily create with Tinkercad Codeblocks.
Getting Started
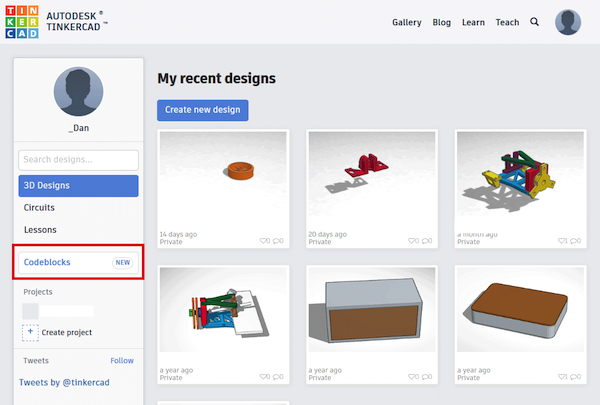
To get started with Codeblocks, visit the Tinkercad website and click the Codeblocks button on the left-hand side of the screen:
The Codeblocks button can be found on the left-hand side of the user dashboard in Tinkercad.
After opening Codeblocks, choose “New design” in the window that pops up. You’ll be greeted with the following screen which is split into three sections:
The new design window in Codeblocks.
Each number on the image above indicates an important feature in Codeblocks. Here's a reference key:
- The code blocks you’ll use to define your program
- This is the panel where you will “write” the program. You won’t need to have any knowledge of a programming language to use this tool. The program is defined by combining the code blocks in the same way you would combine building blocks.
- When you execute your code, the output gets generated here.
- Make the code blocks larger or smaller or reset their size. The trash can is used to remove unwanted blocks.
- You can use these buttons to quickly scroll through all available code blocks.
- Undo and redo your last steps.
- Change the name of your design here.
- Execute your program and control its speed.
Available Blocks
You can choose blocks from six categories:
- The first category, shapes, contains all of Tinkercad's basic shapes.
- Modify-blocks allow you to change the attributes of existing shapes, like their size, color, position, and rotation.
- The orange control-blocks let you define loops to repeat actions.
- The green math-blocks allow you to define variables, change their values, and generate random numbers.
- The data category lists all the variables you created in the program.
- The markup-blocks allow you to add comments and text-output.
Starter Project: Creating a Pen Holder
Let's dive into using Codeblocks to create a simple project.
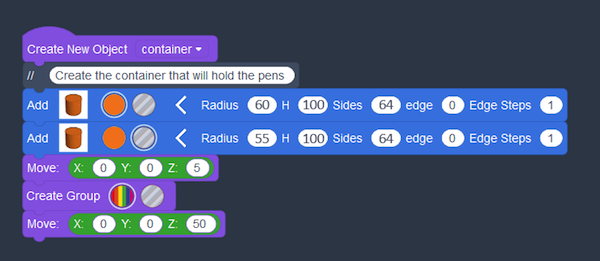
Start by defining the main container by dragging these blocks into the working area:
Define your new project with the above blocks.
Add two cylinders. Make the second one define a hole by selecting the grey circle next to the color.
Code blocks will only affect the objects they are attached to. Since the first move-block is connected to the second cylinder, it won’t move the first one! By creating a group, you combine the two cylinders to one object and the next move-block will, therefore, move both.
Proceed by generating the shapes that will be cut out:
Generate the shapes that will be cut out of the final design.
In the last “Rotate around”-block, nest three blocks within each other: the variable “i” gets multiplied by 20 and the result is fed into the rotate-block.
You can run your program at any time. Right now, the output looks like this:
With all the shapes defined, they now need to be combined to create the final product.
To do this, create a copy of the hexagons and the cylinder. Then duplicate the holes four times and move them up, slightly rotating each line to create a cool effect that covers the entire pen holder.
Duplicate the cutouts to create holes that cover the entire pen holder.
You can see that I deleted the originals in the end. This way it’s possible to group the duplicated shapes without altering the templates. Run the program and watch it generate your pen holder.
Codeblocks Allows for Intricate Designs
This is a new tool, so there are still a few things missing. For example, if-else-clauses that would let you define alternative paths.
Other than that, the tool is easy and fun to work with and it can be pretty useful for hobbyists and makers.