Make a web-based Raspberry Pi home automation system using normal HTTP protocols.
Raspberry Pi home automation system based on Internet of Things
The Internet of Things is the most trending technology today, alongside wearables and robotics. The concept is simple: Devices in your home (or wherever they are) have the capability to communicate with each other via the internet. This technology usually uses sensors to pass data to the internet. Imagine a sensor installed in your garden that uploads data like temperature, humidity, and soil purity to the internet, and this data is visible to you from anywhere in the world. Or imagine home automation systems you can use to control appliances in your home like lights, door locks, and air conditioning through a web interface or smartphone application. A lot of technologies are being developed around this concept, such as independent lightweight IoT networks and protocols for passing data. Here, I will show you how to make a web-based Raspberry Pi home automation system that will allow you to control any appliance in your home from anywhere in the world using normal HTTP protocols.
How Does Web-based Automation Work?
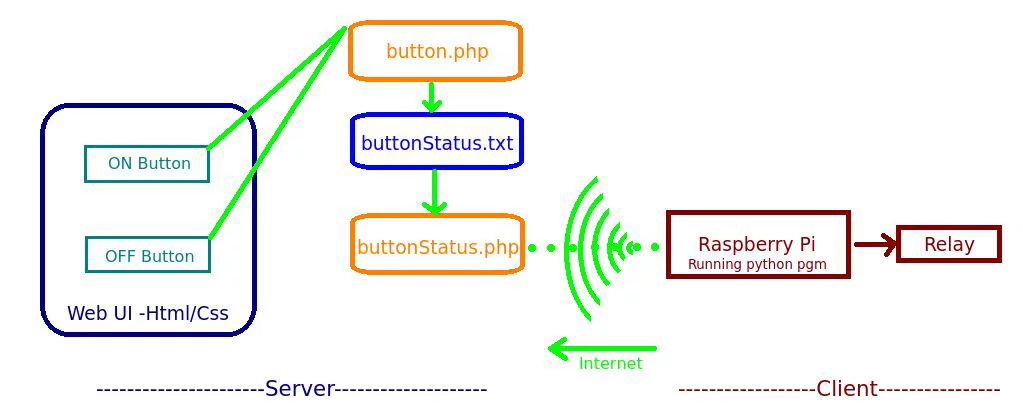
You can consider the whole system to be composed of two parts: server and client. Here, the server is the web interface, consisting of buttons and UI (user interface) that will allow you to turn a device on or off. It consists of PHP files, HTML files, and a .txt file (to store data). The server usually stores information regarding the button press on the page (ON/OFF) on a .txt file. An example of this UI is Maker Pro IoT Implementation. This is a simple HTML file called main.html, which consists of two buttons. The clicking of the buttons will trigger the execution of a PHP file called button.php. This program serves as an API (application programming interface) to store data on to a text file called buttonStatus.txt. The data is a string: "ON" if ON button is clicked, and "OFF" if OFF button is clicked. Thus the current button-press state is recorded in the text file buttonStatus.txt.
Raspberry Pi home automation Block Diagram
The client side consists of a Raspberry Pi with a relay circuit connected to its GPIO pin. The Pi runs a Python program which is used to "post" a URL link using urllib2. That is, the Pi constantly reads the contents of a URL link. Here, the URL link is another PHP file called buttonStatus.php. This PHP file serves as an API to read the contents of the text file buttonStatus.txt. After reading the data, the Python program checks if the string obtained is "ON"/"OFF" based on which it switches ON/OFF the relay respectively via its GPIO pin.
Step 1: Preparing the HTML and PHP Files
First, the server side of the system has to be set up. If you have your own domain, you can use the file manager service to drop these files into your server and control your IoT systems from anywhere in the world. The files to be put on your server are main.html, button.php, buttonStatus.php, and buttonStatus.txt. Download them from the Maker Pro - Raspberry Pi home automation system tutorial and extract it. The program raspbi.py is the Python program, which is to be copied to your Raspberry Pi. If you are new to HTML and PHP, don't worry. This project will need only a basic understanding of the two languages, spending some time on a few tutorials — HTML for beginners, PHP for beginners, and reading the code would be sufficient. The HTML file consists of a basic UI with two buttons. On button press, it triggers a PHP program that writes a string to a .txt file depending on the button pressed. The .txt file stores information of the last button state.
If you don't have a domain, you can simulate a domain in your local network or Wi-Fi using a service called xampp. It is very simple. The instructions for using it are here: Xampp Web Server Emulator Windows and Xampp Web Server Emulator Linux. Using xampp, you can use your PC as a local web server. However, the IoT systems get confined to a control range limited to your home Wi-Fi network. Drop the HTML, PHP and .txt files into the /htdocs/xampp directory.
Step 2: Setting Up the Relay Circuit for the Raspberry Pi Home Automation System
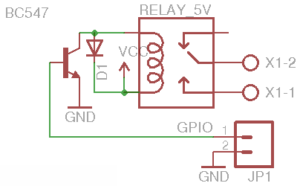
Relay Circuit for the Raspberry Pi home automation system
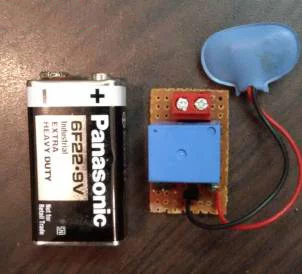
A small relay circuit is to be made, to switch an appliance ON/OFF. It consists of a BC547 transistor, which acts as a switch. The transistor triggers the relay when it receives a voltage at its base from the GPIO pin of Raspberry Pi. A 1N4001 diode is used to protect the transistor from reverse voltages created in the relay coil. The circuit can be powered either using the 5V supply from the Raspberry Pi or using an external battery. Use the schematic and pinout diagram below to make the connections for the Raspberry Pi home automation system.
Step 3: Setting Up the Raspberry Pi
If you have a brand-new Raspberry Pi and are looking for instructions to load the OS into the SD card, use Installing the OS for Raspberry Pi. The default OS used with the Pi is Raspbian. To use the GUI for Pi, use the command "startx" in the terminal. You can use an Edimax Wi-Fi dongle for wireless connectivity, use the Wi-Fi config application on the desktop of your Pi to scan and connect to the Wi-Fi network. The Raspberry Pi is used to continually run a Python program called raspbi.py — copy this file to your Pi. Before executing this file, open the file using "nano raspbi.py" and edit the line that says:
"response=urllib2.urlopen('http://maker.pro/education/buttonStatus.php')" by replacing the link within ' ', with your own link generated either through xampp or your own domain on using the command "sudo python raspbi.py". This will initiate the program.
Edimax Wifi Dongle EW 7811UN
You can use the Raspberry Pi without a monitor by using SSH. SSH (Secure Shell) can be used to control the Pi remotely from a PC on the same home network if you know the IP address of your Pi. Use "ifconfig" command on your Pi to find the IP address. Use "sudo /etc/init.d/ssh start" to initiate the SSH service. Then, from a remote PC using putty software (for Windows), open the terminal and enter the command "sudo ssh ipaddress -l pi". "ipaddress" is replaced with the actual IP address you obtained for the Pi in the range 192.168.1.1 - 192.168.1.254.
Raspberry Pi home automation system Test Setup
Connect the relay circuit to the Raspberry Pi. You need to connect GPIO pin no: 5 and 6 (GND) to the circuit, as shown in the schematic. Please note: Raspberry Pi uses GPIO pins 5 and 6 to get into safe mode by shorting them together. Hence, please use any other GPIO other than 5 by editing the Python program to prevent booting into the safe mode. This video shows the Raspberry Pi home automation system in action:
This system can be modified to control anything in your home from anywhere in the world. You can even use it to collect data from sensors and view them from anywhere. Protocols like MQTT and APIs of thingspeak can be used for a large number of devices and sensors to standardize the communication protocol.