Maker Pro
Maker Pro

impose current ceiling

flippineck

Sep 8, 2013
358
Joined
Sep 8, 2013
Messages
358
So.. I think I have some kind of understanding but it's probably very flawed..

As the current rises, the base potential of Q2 rises. At a certain point the rising potential at Q2's base causes sufficient base-emitter current to flow, to switch Q2 toward conduction. When this happens, the gate-source potential at Q1 drops or even might go slightly negative. This increases the drain-source resistance of Q1 or even switches it off entirely, lowering the current.

So the mosfet requires a gate-source potential applied to switch the device “on”.. so does this mean I need to select an enhancement mode n-channel mosfet rather than a depletion type?

Just thinking about that diode, does it just leak anything above 10V away from the gate ("it doesn't need any more help to turn on") and otherwise doesn't affect operation; it doesn't mean that the circuit will cut the flow of current altogether if the gate starts to experience more than 10V coming from the panels? I think I see now that the 10k resistor would not be a bar to a high potential reaching the gate.

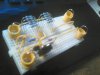
I'm still finding it hard to understand about the ten 2R2 resistors - I'm assuming these are all in parallel - particularly why there is a constant voltage across them, and how they all always end up dissipating the same power despite chopping some out or adding some in.

Any opportunity to correct my thinking please be my guest! I'm going to wait till I fully understand it before I select parts and try to build it.

Very big thanks for this circuit, although I'm having trouble fully 'getting it', I'm enjoying trying ;-)
 
Last edited:

(*steve*)

¡sǝpodᴉʇuɐ ǝɥʇ ɹɐǝɥd
Moderator
Jan 21, 2010
25,510
Joined
Jan 21, 2010
Messages
25,510
I *think* I'm beginning to get how the circuit works - not sure about the zener diode though, how does it protect the gate of the mosfet.. with a 10k resistor upstream of it, where does the danger of 10V come from?

The circuit will have significantly more than 10V across it. Without the zener diode there is nothing stopping the gate voltage rising to the voltage across the panels. If the mosfet has a maximum gate voltage of (say) 15V, this would instantly destroy it
 

(*steve*)

¡sǝpodᴉʇuɐ ǝɥʇ ɹɐǝɥd
Moderator
Jan 21, 2010
25,510
Joined
Jan 21, 2010
Messages
25,510
R1 turns the mosfet hard on. the job of the transistor is to start turning it off when the voltage across the sense resistor reaches Vbe for the transistor. The zener diode puts a clamp on how hard the mosfet can be turned on -- you don't want the gate voltage to rise too high because even though it turns the mosfet on really hard (a good thing when you're not current limiting) there is a limit to the insulation between the gate and the rest of the mosfet. Exceed this and your mosfet goes to meet its maker.
 

flippineck

Sep 8, 2013
358
Joined
Sep 8, 2013
Messages
358
Thanks for the help understanding it - more confident to pick parts and build it now :)

I think I get pretty much the full operation of the circuit now, just a bit confused about what you mean regarding R1's constant voltage & it's individual multiple elements always dissipating the same power. I would have thought that the voltage would be variable as part of the very operation of the circuit? I'm clearly still misunderstanding that part.
 

(*steve*)

¡sǝpodᴉʇuɐ ǝɥʇ ɹɐǝɥd
Moderator
Jan 21, 2010
25,510
Joined
Jan 21, 2010
Messages
25,510
I only consider the case when the dissipation is at the maximum. In this case, regardless of the resistance, the voltage across the sense resistor is limited to about 0.7V. Because P = V^2/R, and V (and therefore V^2) is constant, P is directly proportional to 1/R.

If you recall the general formula for resistors in parallel: 1/Rt = 1/R1 + 1/R2 + 1/R3 + ... + 1/Rn, it is clear that the reciprocal of the total resistance is the sum of the reciprocal of each resistor.

Intuitively this also makes sense. With a constant voltage V across a resistor with resistance R, the current I flows. If the resistance is replaced with multiple (n) resistors with the resistance R, then the parallel resistance is R/n. Assuming the same voltage, the current is V/(R/n) which is nI. The total power is nP, various methods will get you to the current in each resistor being equal, or the power diffusion being equal, so you get the power in each resistor still being P.
 

flippineck

Sep 8, 2013
358
Joined
Sep 8, 2013
Messages
358
'at maximum dissipation' - that's the bit of the jigsaw I was missing I think. Thanks!

Sun's doing it's random max shining thing at the moment, just blew a bunch of 5A fuses in a row and the battery's flat because of the non-auto recovery nature of fuses. This means I'm reliant on Noisy Diesel Generator which is banging away outside the office window for a cup of coffee. Not good, auto current control will be very welcome...
 

flippineck

Sep 8, 2013
358
Joined
Sep 8, 2013
Messages
358
Ok got most of the bits now, am building it on a prototyping board to begin with. Only part I haven't been able to get hold of is a suitable mosfet - maplin store down the road only had 2N7000 in a TO92 case and the current handling capacity looks a bit low, IIRC it was only 2 or 3 hundred milliamps.

These seem pretty plentiful on ebay, would they be suitable:

IRF540
N-channel silicon enhancement mode MOSFET
Absolute Maximum Ratings:
Drain to Source Breakdown Voltage 100V
Drain to Gate Voltage 100V
Continuous Drain Current 28A
Rds(on) 0.077 Ohm
Gate to Source Voltage +-20V

Transistor's a BC549C, 100 milliamp max collector current
 

(*steve*)

¡sǝpodᴉʇuɐ ǝɥʇ ɹɐǝɥd
Moderator
Jan 21, 2010
25,510
Joined
Jan 21, 2010
Messages
25,510
After a digikey search I'd recommend a IPA50R199CP

It has an insulated tab which will make it easier to place these on the same heat sink. Otherwise you'll need insulating mounting hardware.
 

flippineck

Sep 8, 2013
358
Joined
Sep 8, 2013
Messages
358
Thanks Steve. I've got a 0-30V analog voltmeter, a 0-15A analog ammeter, and a new variable bench power supply 10A/30V on the way as well, figured I'd need those to actually feed it & see what's going on.
 

(*steve*)

¡sǝpodᴉʇuɐ ǝɥʇ ɹɐǝɥd
Moderator
Jan 21, 2010
25,510
Joined
Jan 21, 2010
Messages
25,510
Sounds good. Have you done any heat sink calculations?
 

flippineck

Sep 8, 2013
358
Joined
Sep 8, 2013
Messages
358
No. I was just going to take a sledgehammer approach of having the MOSFET bolted with computer heatsink goo, to a great big lump of copper, with flying leads to the prototyping board to begin with.

I've kept longish legs on all the 2R2's and have them spaced out a bit on the prototyping board for some airflow.

I'm conversant with basic V=IR and P=IV but whether I get the real input figures right, and what any eventual figure for dissipation in the MOSFET really means in terms of heatsink size or design, I'd not be so sure of.

(Is there a sort of grey area lower than Rds(fully on) where resistance is quite a bit higher, but current not enough lower, to avoid some kind of 'spike' in the dissipation characteristic...)
 

(*steve*)

¡sǝpodᴉʇuɐ ǝɥʇ ɹɐǝɥd
Moderator
Jan 21, 2010
25,510
Joined
Jan 21, 2010
Messages
25,510
No. I was just going to take a sledgehammer approach of having the MOSFET bolted with computer heatsink goo, to a great big lump of copper, with flying leads to the prototyping board to begin with.

As long as each mosfet is on a different heatsink (or you're just using a single mosfet) you'll be OK for testing.

I've kept longish legs on all the 2R2's and have them spaced out a bit on the prototyping board for some airflow.

They shouldn't get too warm. They should dissipate about half their rated power. Start with just a single 2R2 resistor. This should give you a 320mA limit.

I'm conversant with basic V=IR and P=IV but whether I get the real input figures right, and what any eventual figure for dissipation in the MOSFET really means in terms of heatsink size or design, I'd not be so sure of.

Design for the entire voltage from the panel across the mosfet and you will be super conservative. If it turns out that you have a ridiculous requirement for heatsinking, then you can be less conservative.

(Is there a sort of grey area lower than Rds(fully on) where resistance is quite a bit higher, but current not enough lower, to avoid some kind of 'spike' in the dissipation characteristic...)

You don't have to worry about that. V * I is all you need to be interested in. Since it's hard to calculate the actual voltage, the required resistance (which will just find itself) is doubly hard to calculate. The voltage may be about 20% of the panel voltage, but that's just a guess. If the inverter presents as a short, the voltage will be 100% of the panel voltage, and as I said, that's a nice conservative place to start.

If you're this conservative you can probably assume an ambient temperature of 25C, however if you want to choose the minimum heatsink size you'll have to consider the effects of ambient temperature, and the actual performance of the heatsink (and possible other factors).
 

flippineck

Sep 8, 2013
358
Joined
Sep 8, 2013
Messages
358
just waiting for the power supply and the meters


As long as each mosfet is on a different heatsink (or you're just using a single mosfet) you'll be OK for testing.


They shouldn't get too warm. They should dissipate about half their rated power. Start with just a single 2R2 resistor. This should give you a 320mA limit.


Design for the entire voltage from the panel across the mosfet and you will be super conservative. If it turns out that you have a ridiculous requirement for heatsinking, then you can be less conservative.


You don't have to worry about that. V * I is all you need to be interested in. Since it's hard to calculate the actual voltage, the required resistance (which will just find itself) is doubly hard to calculate. The voltage may be about 20% of the panel voltage, but that's just a guess. If the inverter presents as a short, the voltage will be 100% of the panel voltage, and as I said, that's a nice conservative place to start.

If you're this conservative you can probably assume an ambient temperature of 25C, however if you want to choose the minimum heatsink size you'll have to consider the effects of ambient temperature, and the actual performance of the heatsink (and possible other factors).
 

Attachments

  • progress.jpg
    progress.jpg
    64.9 KB · Views: 61

(*steve*)

¡sǝpodᴉʇuɐ ǝɥʇ ɹɐǝɥd
Moderator
Jan 21, 2010
25,510
Joined
Jan 21, 2010
Messages
25,510
Remember that those breadboards are not good for high currents
 

flippineck

Sep 8, 2013
358
Joined
Sep 8, 2013
Messages
358
Thanks. Found some further guidance on that point here: http://www.electro-tech-online.com/threads/breadboards-maximum-current.9597/

If I can get it to work for a few seconds in the single digit amps on the breadboard, I'll most likely rapidly go and get some ferric chloride & a pen & maybe progress to an etched PCB.

Without having looked into it too deeply I was vaguely thinking whether I could ultimately make a small module for each individual solar panel, and parallel up all the outputs. Would I encounter problems with the output of some units, trying to push back into the outputs of others?
 

(*steve*)

¡sǝpodᴉʇuɐ ǝɥʇ ɹɐǝɥd
Moderator
Jan 21, 2010
25,510
Joined
Jan 21, 2010
Messages
25,510
Without having looked into it too deeply I was vaguely thinking whether I could ultimately make a small module for each individual solar panel, and parallel up all the outputs. Would I encounter problems with the output of some units, trying to push back into the outputs of others?

Not really, but you may not maximise your power, especially if one panel is slightly shaded.
 

flippineck

Sep 8, 2013
358
Joined
Sep 8, 2013
Messages
358
It's all a balancing act between collecting as much power as possible in the conventional sense, and collecting at least a useable amount of power on the usual cloudy days - which necessitates a fairly large number of panels all contributing various small trickles of current. I think it's quite likely the individual panels will produce a variety of currents due to shade, manufacturing tolerance, age, individual positioning etc.
 

flippineck

Sep 8, 2013
358
Joined
Sep 8, 2013
Messages
358
PSU came in the post :) needed one of these for years.

Attached a small dc brushed motor as a load (despite wondering if that might be a bit silly because of back EMF / inductive issues) - threw caution to the wind in impatience & powered up

Worked beautifully!

Each 2R2 sense resistor seemed to produce an overall current limit of about 200mA

one resistor - 200mA, slow motor
two resistors - 400mA, normal speed motor
three resistors - 600mA, revving the nuts off motor.
four resistors - daren't go higher, mrs flippineck got scared of burning smell.

in each case, varying the applied voltage right up to the 30V max of the PSU, with the current set to unregulated, did not cause an increase in the current above the limit set by the sense resistor.

The ammeter readout on the PSU is to one decimal place so the figures above are fairly approximate. At around 600mA, I found the burning smell to be coming from the MOSFET which was very hot.

This was with the IRF540 MOSFET - it says it can stand a max continuous drain current of 28A, but it was so hot at 600mA I'm not sure

On the other hand I've just tested it very briefly with absolutely no heatsinking beyond a bit of free air. This is maybe a really good education on how necessary heatsinks are, and the actual magnitude of the job they do!

Next job, tidy it all up so it doesn't explode when I test it any further..
 

(*steve*)

¡sǝpodᴉʇuɐ ǝɥʇ ɹɐǝɥd
Moderator
Jan 21, 2010
25,510
Joined
Jan 21, 2010
Messages
25,510
This was with the IRF540 MOSFET - it says it can stand a max continuous drain current of 28A, but it was so hot at 600mA I'm not sure

It was probably trying to dissipate 10W to 15W. That's waaaaay too much for a TO220 device all by itself.

I would probably not use that mosfet for anything critical any more...

Grab another one and fit it to a heatsink. You should be able to leave your finger resting on the mosfet at this current, even with the output shorted.
 

flippineck

Sep 8, 2013
358
Joined
Sep 8, 2013
Messages
358
Got rid of the motor & replaced it with twelve 20W 12V halogen lamps wired up as six series pairs in parallel. I figure this works out as a decent resistive load for 10A at 24V, as something to approximate the battery on charge on the other side of the charge controller, bearing in mind the panels are rated at up to 21V open circuit

New MOSFET now heatsinked - found a finned aluminium one roughly 4cm x 4cm x 1cm on an old graphics card, which lent itself nicely to the purpose. Hoping it's big enough. I'd ordered a bag of 5 so got 4 good ones left.
 
Top