Use an Arduino and a servo to shoot food to your cat! (Also works with other animals). Check out the video below to see how this Arduino Servo Catapult works. While maybe not the most practical application, this project will teach you the basics of servo motors and analog inputs, which can be implemented into more practical projects, like these:
Before we get started with our arduino servo catapult, when using a motor, always use an external source to power your Arduino, do not draw power from a USB connection! Our Cat-a-pult uses an Arduino Uno with servo control and its analog input to read the FSR value which controls the servo.
When we say that a servo starts in "the spot of zero," we are referring to the servo's neutral position. If you look at the diagram below, if a 1.5ms pulse width is applied to the control line, the servo will sit at its neutral position, which in this case is 90º. When the pulse width increases or decreases, the servo moves towards 180º (Increase) or 0º (Decrease). If you choose to describe the neutral position as 0º, your servo's angular range would be from -90º to +90º. Our servo should move 90º (I said 110º in the video, oops!)
Diagram courtesy of Servo City
We initialized our serial monitor so that we can read our FSR's values and adjust our kitty-threshold accordingly. Once we're satisfied with our threshold value, we can turn the servo to lock the CAT-apult by pressing our pushbutton. When the cat puts its weight on the FSR, the servo moves back to the neutral position and launches cat food into the feline's face.
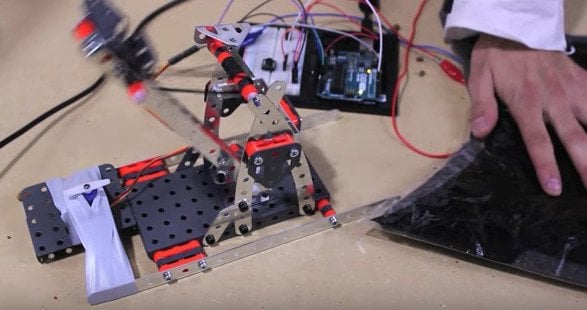
CAT-apult in action!
Schematic
The Code
In theory, your Arduino servo catapult code will do the following:
Read the analog input and compare it to your threshold range
Read the button input and move your servo accordingly
Move the servo back to the neutral position when the threshold value is met
// Written by Ryan Jones#include <Servo.h>constint buttonPin = 2; //button used to move servo to lock position, attached to digital input 2int pressurePin = 0; // pressure sensor to trigger release of catapult, attached to analog input 0int buttonState = 0; //initial state of buttonint threshold=70; //threshold value of sensor at which the catapult launches (change this to fit your needs)
Servo myservo; // create a servo object to control a servoint position = 0; //servo starts at neutral positionvoidsetup(){
Serial.begin(9600); //display serial input (reads pressure sensor value - adjust threshold accordingly)
pinMode(buttonPin, INPUT); //make the button pin an input pin
myservo.attach(9); //servo attached to pin 9 to hold/fire catapult
}
voidloop(){
buttonState = digitalRead(buttonPin); //read value of button
pressurePin=analogRead(pressurePin); //read value of pressure sensorif(buttonState == HIGH) { //if button pressed...
myservo.write(90); //...move servo 90 degrees (change this number to fit your personal use)
}
if(pressurePin > threshold) { //if pressure sensor value is above threshold...
myservo.write(0); //...move servo back to neutral position
}
}
Now It's Ready for Action
Once you have made the connections and implemented the code, strategically place your arduino servo catapult so your cat doesn’t see what’s coming! Now you can sit back and enjoy your new knowledge, angry cat, and messy floor.
Incoming! This is Olive's favorite part.
If you would like to see more, you can find more MIT-i innovations on YouTube. Have any ideas for cool projects with Arduinos and servo motors? Let us know in the comments!