Learn about OpenCV and visual pattern detection techniques by detecting the grid of a Sudoku puzzle!
In this computer vision post, you are going to learn about detecting the Sudoku puzzle pattern using OpenCV. This technique will let you create augmented-reality-based experiences for your projects and allow you to familiarize yourself with the techniques used for pattern detection using OpenCV, thereby broadening your knowledge on the topic.
This tutorial includes the following steps:
- Downsampling the image.
- Blurring it.
- Applying adaptive threshold.
- Finding biggest blob that will match the Sudoku puzzle.
- Cropping the image.
- Finding and drawing contours.
Installing OpenCV to Raspberry Pi
If you’re new to OpenCV and haven’t installed the program to your Raspberry Pi, check out How to Set Up OpenCV on Raspberry Pi for Face Detection for step-by-step setup instructions.
OpenCV Code Walkthrough
Let’s explore how the code works for this tutorial. You can find the full code after our walkthrough.
First, we need to import the necessary packages.
import cv2
import numpy as np
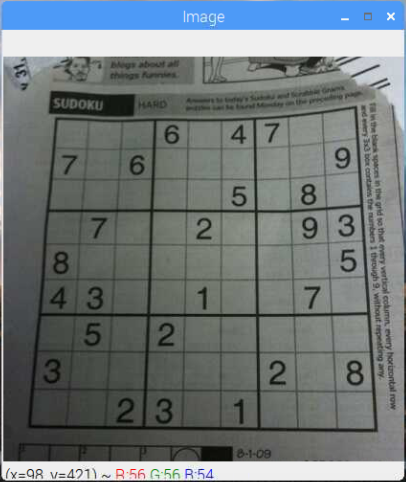
Then we load an image of which we are going to find grid lines. Take a sample picture from your newspaper and copy it in your project folder.
image  = cv2.imread("sudoku.jpg")
cv2.imshow("Image", image)
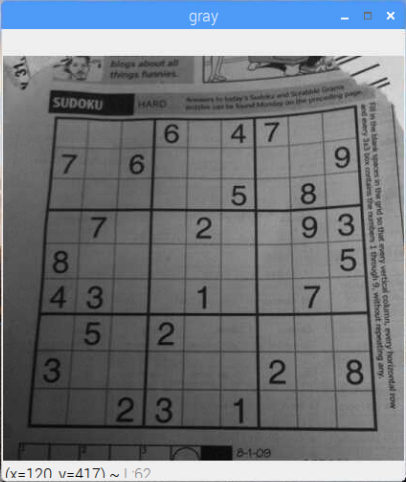
We won’t need the color information, so once the image is uploaded, we need to downsample the image by converting it to grayscale.
gray = cv2.cvtColor(image, cv2.COLOR_BGR2GRAY)
cv2.imshow("gray", gray)
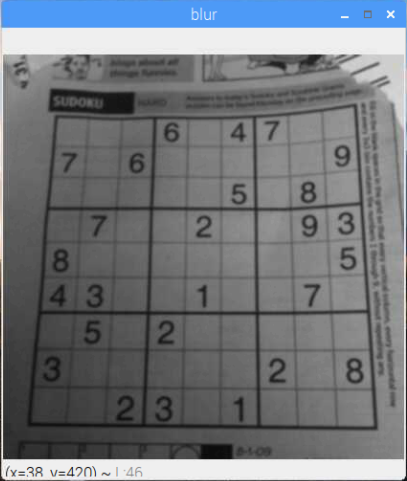
Once the image is in grayscale, we can apply a Gaussian blur on the image to remove the noise, making the extraction of the grid lines a bit easier.
blur = cv2.GaussianBlur(gray, (5,5), 0)
cv2.imshow("blur", blur)
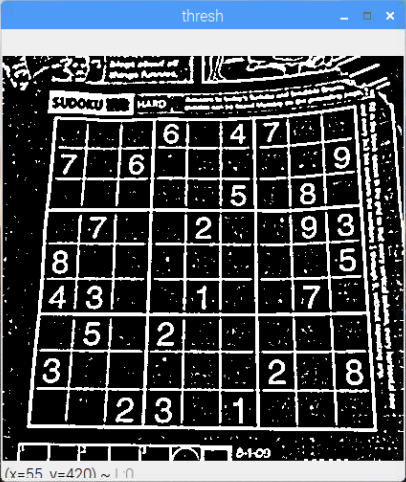
After that, we are going to apply adaptive thresholding. This step is important because normal thresholding thresholds the image as a whole, while adaptive threshold thresholds the image taking an optimum value for a local neighborhood.
The image can have varying illumination levels, so a good choice for a thresholding algorithm would be an adaptive threshold. It calculates a threshold level several small windows in the image. This threshold level is calculated using the mean level in the window, so it keeps things illumination independent.
thresh = cv2.adaptiveThreshold(blur, 255, 1, 1, 11, 2)
cv2.imshow("thresh", thresh)
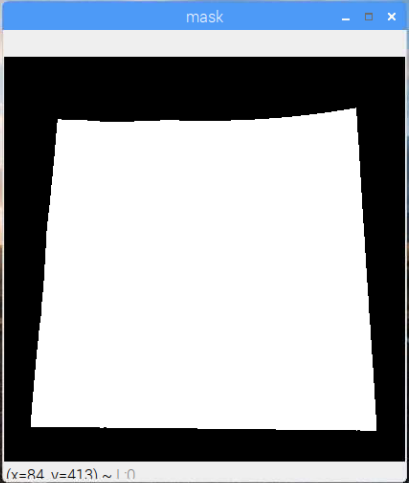
Now it’s time to find the Sudoku borders. We have assumed that the biggest square in the image is the Sudoku square. Therefore, we find out the biggest blob.
We start by finding out the contours in the thresholded image. After finding out the contours, we start to look at the biggest blob. The biggest blob will be one that will have the maximum area, so we process all the contours to find the one that has the maximum area.
max_area = 0
c = 0
for i in contours:
        area = cv2.contourArea(i)
        if area > 1000:
                if area > max_area:
                    max_area = area
                    best_cnt = i
                    image = cv2.drawContours(image, contours, c, (0, 255, 0), 3)
        c+=1
With the borders of the Sudoku puzzle, the next thing to create is a mask image according to these borders so that we will only detect grids inside the borders.
mask = np.zeros((gray.shape),np.uint8)
cv2.drawContours(mask,[best_cnt],0,255,-1)
cv2.drawContours(mask,[best_cnt],0,0,2)
cv2.imshow("mask", mask)
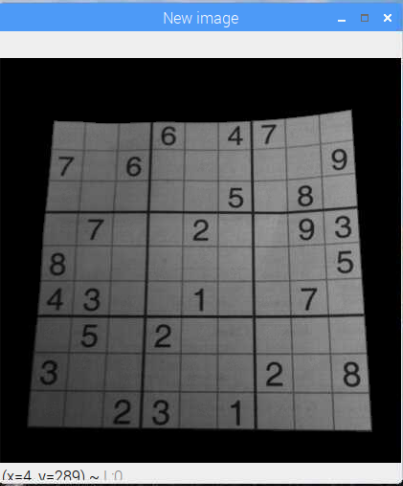
We create another image that is the same as the one we are processing and crop it according to the borders of Sudoku.
out = np.zeros_like(gray)
out[mask == 255] = gray[mask == 255]
cv2.imshow("New image", out)
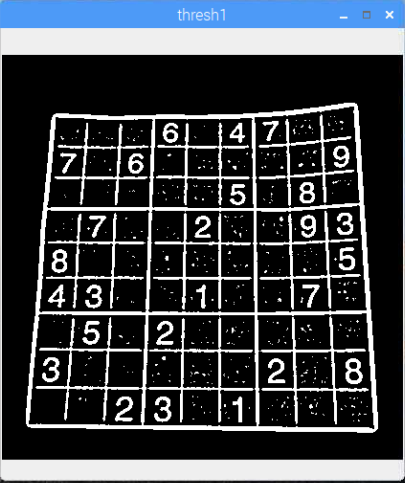
Then, we blur the image and apply the adaptive threshold on the new image.
blur = cv2.GaussianBlur(out, (5,5), 0)
cv2.imshow("blur1", blur)
thresh = cv2.adaptiveThreshold(blur, 255, 1, 1, 11, 2)
cv2.imshow("thresh1", thresh)
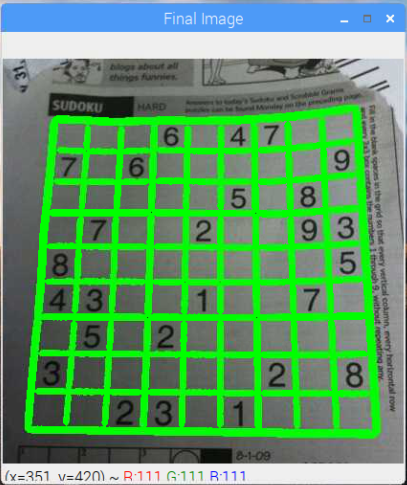
After that, we find out the contours in the image and draw these contours on the image.
_, contours, _ = cv2.findContours(thresh, cv2.RETR_TREE, cv2.CHAIN_APPROX_SIMPLE)

c = 0
for i in contours:
        area = cv2.contourArea(i)
        if area > 1000/2:
            cv2.drawContours(image, contours, c, (0, 255, 0), 3)
        c+=1


cv2.imshow("Final Image", image)
cv2.waitKey(0)
cv2.destroyAllWindows()
Full Tutorial Code
The Python code is as follows:
import cv2
import numpy as np

image  = cv2.imread("sudoku.jpg")
cv2.imshow("Image", image)

gray = cv2.cvtColor(image, cv2.COLOR_BGR2GRAY)
cv2.imshow("gray", gray)

blur = cv2.GaussianBlur(gray, (5,5), 0)
cv2.imshow("blur", blur)

thresh = cv2.adaptiveThreshold(blur, 255, 1, 1, 11, 2)
cv2.imshow("thresh", thresh)

_, contours, _ = cv2.findContours(thresh, cv2.RETR_TREE, cv2.CHAIN_APPROX_SIMPLE)

max_area = 0
c = 0
for i in contours:
        area = cv2.contourArea(i)
        if area > 1000:
                if area > max_area:
                    max_area = area
                    best_cnt = i
                    image = cv2.drawContours(image, contours, c, (0, 255, 0), 3)
        c+=1

mask = np.zeros((gray.shape),np.uint8)
cv2.drawContours(mask,[best_cnt],0,255,-1)
cv2.drawContours(mask,[best_cnt],0,0,2)
cv2.imshow("mask", mask)

out = np.zeros_like(gray)
out[mask == 255] = gray[mask == 255]
cv2.imshow("New image", out)

blur = cv2.GaussianBlur(out, (5,5), 0)
cv2.imshow("blur1", blur)

thresh = cv2.adaptiveThreshold(blur, 255, 1, 1, 11, 2)
cv2.imshow("thresh1", thresh)

_, contours, _ = cv2.findContours(thresh, cv2.RETR_TREE, cv2.CHAIN_APPROX_SIMPLE)

c = 0
for i in contours:
        area = cv2.contourArea(i)
        if area > 1000/2:
            cv2.drawContours(image, contours, c, (0, 255, 0), 3)
        c+=1


cv2.imshow("Final Image", image)
cv2.waitKey(0)
cv2.destroyAllWindows()
OpenCV Technique for AR-Based Projects
And voila, you just detected and matched the pattern, use you can use this technique to create augmented-reality-based experiences or to detect and track them using a robot.