Use MQTT to connect your Raspberry Pi IoT devices and control them from anywhere in the world.
Sometimes, you may find yourself in a situation where you want to make devices communicate with each other via the internet. For example, while I was traveling to another city, I realized that I forgot to turn off the lights of my room. In this situation, I ideally want to have an Android app or a website with which I can monitor the status my home’s lights and able to turn them on or off.
So, let's say that you want to make an electrical switch connected to a bulb in a room which can be operated anywhere from the world. A fast and stable option is using MQTT.
What Is MQTT?
MQTT (Message Queue Telemetry Transport) is a lightweight messaging protocol which is ideal for communication of IoT connected devices. For an in-depth explanation, check out the What is MQTT? tutorial.
MQTT has three components: broker, publisher, and subscriber. One popular online broker is Mosquitto. A broker is an intermediary entity that handles the communication going on between devices. A publisher is a device that sends messages. A subscriber listens to the messages sent by the publisher.
There is one more important thing in MQTT and that is a topic. A topic is necessary for communication between different devices. For example, Device A wants to send a message to Device B. To do so, there should be something common between the two and that’s the topic. Think of it like a phone number.
CloudMQTT
CloudMQTT is a broker service that provides free MQTT communication for a certain number of devices.
Setting Up MQTT
- Create an account
- Go to the control panel in top right corner
- Click on the "create" button
- Enter CMQTT in the "name" field
- On the same page, in manage users add a user with:
- Name: pi
- Password: pi
- Click on "save"
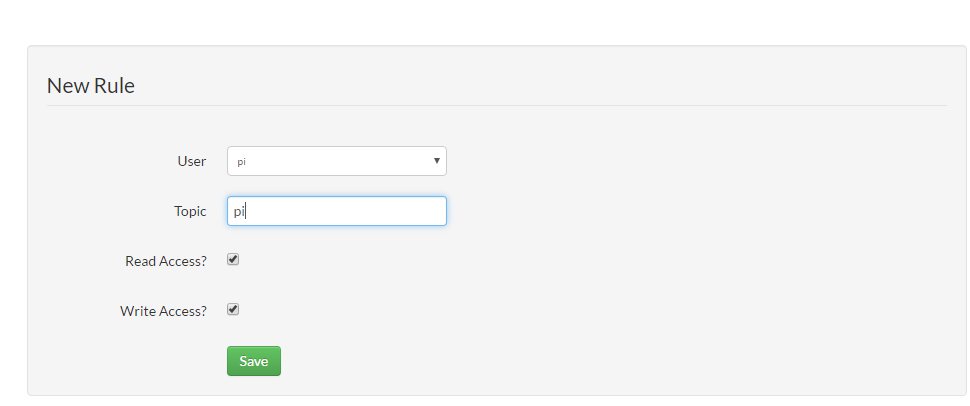
- Again on the same page at the end, add:
User: pi
Topic: pi
- And click on "save"
- Now, in the top bar, click on "WebSocket UI"
- You will see a page where all the sensor data will be displayed
- Upload the code below to Arduino
The code below is an example code with dummy strings used in place of sensors. You can replace strings with the values coming from sensors.
String sensorsData="";
String randSensorsData="";
void setup() {
// put your setup code here, to run once:
Serial.begin(9600);
pinMode(A0,INPUT);//temperature sensor
pinMode(A1,INPUT);//windspeed sensor
pinMode(A2,INPUT);//wind direction sensor
pinMode(A3,INPUT);//rain fall sensor
pinMode(A4,INPUT);///barometric pressure sensor
}

void loop() {
// put your main code here, to run repeatedly:

sensorsData=String("-")+String("S1=")+String(analogRead(A0))+String(",")+String("S2=")+String(analogRead(A1))+String(",")+String("S3=")+String(analogRead(A2))+String(",")+String("S4=")+String(analogRead(A3))+String(",")+String("S5=")+String(analogRead(A4))+String("+");
randSensorsData=String("-")+String("S1=")+String(random(100))+String(",")+String("S2=")+String(random(200))+String(",")+String("S3=")+String(random(125))+String(",")+String("S4=")+String(random(500))+String(",")+String("S5=")+String(random(50))+String("+");
Serial.println(sensorsData);
Serial.println(randSensorsData);
delay(200);
}
This code is using Analog Pins of Arduino to get values from sensors and is passing to Raspberry Pi for processing and MQTT communication. The code above is using random function to generate random values to simulate analog pins.
- The sensors should be connected to A0,A1,A2,A3,A4 pins
- Serial.println(randSensorsData);
- This line is sending random data for checking the server
- You can also check the random data being displayed in WebSocket UI
Open python 2.7 and write the following code in it:
import paho.mqtt.client as mqtt
import time
data=”Hello from Raspberry Pi!”
while True:


print(data)
try:
client=mqtt.Client()
client.username_pw_set("hgztvlwh","qDz_-oAWSfBR")#replace with your user name and password
client.connect("m13.cloudmqtt.com",13017,60)
client.publish("pi",data)#pi is topic
time.sleep(1)
except KeyboardInterrupt:
print("end")
client.disconnect()
- Now run the code using python 2.7
- You’ll see the sensors data being displayed in WebScoket UI of CloudMQTT after every second.
- Here you will see the data being sent from Raspberry Pi.
The amazing thing is, CloudMQTT provides a full-fledged dashboard for testing purposes. You can subscribe or publish to topics using this dashboard.