Learn how to set up object detection using a Raspberry Pi camera and color segmentation with OpenCV.
This tutorial covers object detection using color segmentation with OpenCV. You can use this technique to create object following robots or for any project that requires image recognition.
Once you can define and distinguish the desired pixels representing the object you want to track, you can create your program to perform your desired functions.
If you are new to OpenCV, please check out my earlier getting started guide.
Let’s jump in! I’m covering the sections of code to reflect each section’s importance. You can find the complete Python code at the end of the article.
Import Packages
First, import the packages required for this project.
import cv2
from picamera.array import PiRGBArray
from picamera import PiCamera
import numpy as np
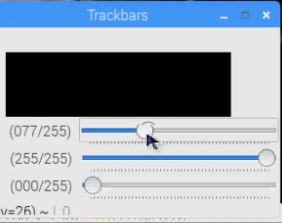
Create Your Trackbars
Next, we create the trackbars to help us with selecting a color. To create the trackbars, we have the cv2.createTrackbar() function. We have five arguments to create:
- The trackbar name
- The window name to which it is attached
- The default value
- The maximum value
- The callback function executed every time trackbar value changes
The callback function always has a default argument, which is the trackbar position In our case, the function does nothing, so we will simply pass.
We are going to create three trackbars for blue, green, and red. Each trackbar will have a default value of 0 and a maximum value of 255 and will be attached to the window named Trackbars.
def nothing(x):
    pass

cv2.namedWindow("Trackbars")

cv2.createTrackbar("B", "Trackbars", 0, 255, nothing)
cv2.createTrackbar("G", "Trackbars", 0, 255, nothing)
cv2.createTrackbar("R", "Trackbars", 0, 255, nothing)
Setting up the Raspberry Pi Camera
Now, we can initialize the camera object that allows us to play with the Raspberry Pi camera. If you're unsure how to set up your Raspberry Pi camera, check out our tutorial that covers the setup process.
We set the resolution at (640, 480) and the frame rate at 30 fps.
camera = PiCamera()
camera.resolution = (640, 480)
camera.framerate = 30
The PiRGBArray()
PiRGBArray() gives us a 3-dimensional RGB array organized (rows, columns, colors) from an unencoded RGB capture.
PiRGBArray gives us the advantage of reading the frames from Raspberry Pi camera as NumPy arrays, making it compatible with the OpenCV. It avoids the conversion from JPEG format to OpenCV format which would slow our process.
PiRGBArray()takes 2 arguments: the first is the camera object and the second is the resolution.
rawCapture = PiRGBArray(camera, size=(640, 480))
The capture_continuous Function
Now we are going to use the capture_continuous function to start reading the frames from the Raspberry Pi camera module.
The capture_continuous function takes three arguments:
- rawCapture
- The format in which we want to read each frame. Since OpenCV expects the image to be in the BGR format rather than the RGB, we need to specify the format to be BGR.
- The use_video_port boolean. Making this true means that we treat the stream as video.
Once we have the frame, we can access the raw NumPy array via the .array attribute.
for frame in camera.capture_continuous(rawCapture, format="bgr", use_video_port=True):
	image = frame.array
Setting up the Color Recognition
Now we are going to convert images from the BGR to the HSV color space. The HSV (hue saturation value) space gives us better results when doing color-based segmentation.
hsv = cv2.cvtColor(image, cv2.COLOR_BGR2HSV
Next, we create the trackbars used to select the color.
B = cv2.getTrackbarPos("B", "Trackbars")
G = cv2.getTrackbarPos("G", "Trackbars")
R = cv2.getTrackbarPos("R", "Trackbars")
After that, we can find out the lower and upper limit of the color in HSV.
green = np.uint8([[[B, G, R]]])
hsvGreen = cv2.cvtColor(green,cv2.COLOR_BGR2HSV)
lowerLimit = np.uint8([hsvGreen[0][0][0]-10,100,100])
upperLimit = np.uint8([hsvGreen[0][0][0]+10,255,255])
Set the upper and lower limit of each color in HSV.
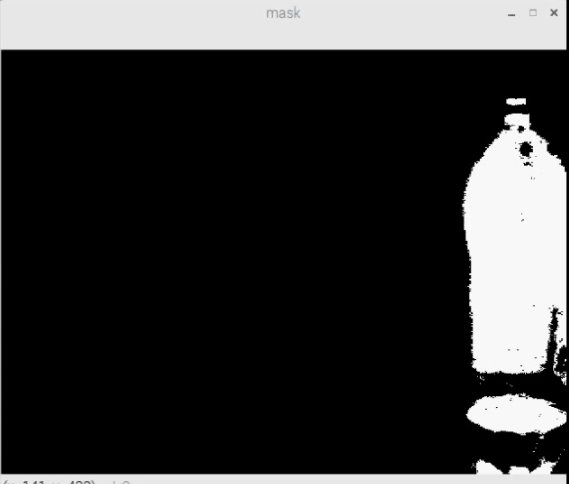
Next, we adjust the threshold of the HSV image for a range of each selected color.
mask = cv2.inRange(hsv, lowerLimit, upperLimit)
Set the thresholds for the HSV images for the range of your selected colors.
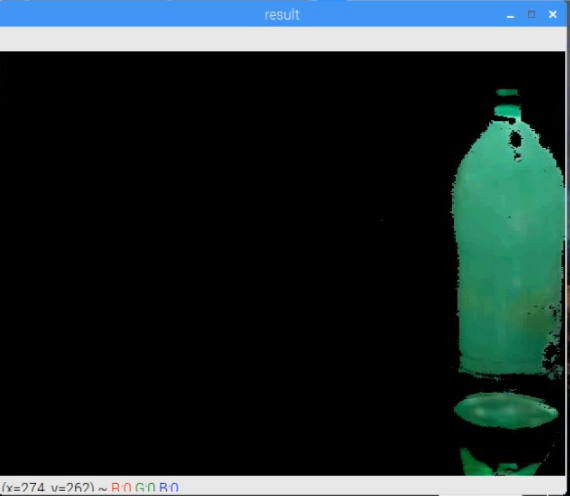
Now we can extract the objects of the colors in the frame.
result = cv2.bitwise_and(image , image , mask=mask)
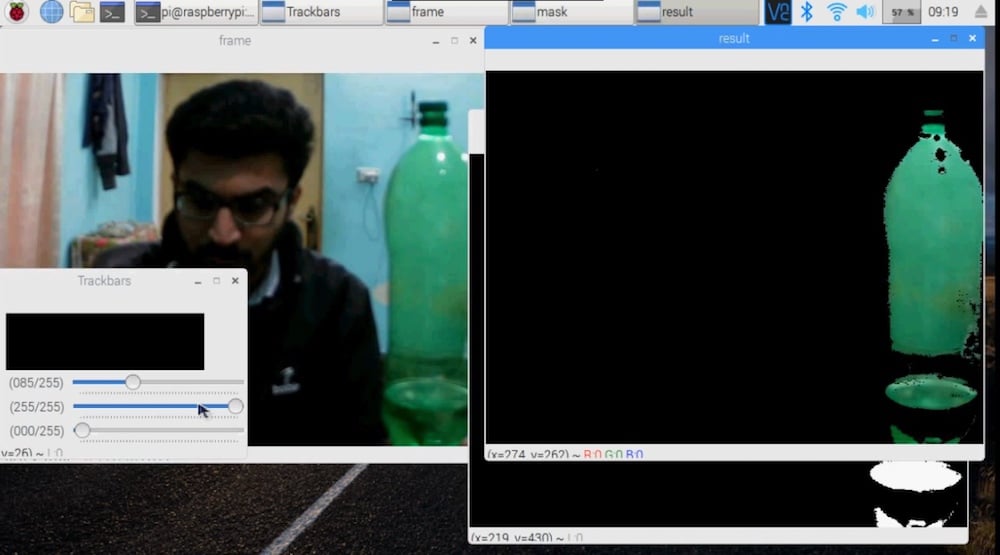
Now, the program can detect the objects that contain the colors you set.
Let’s show the result in the output window. cv2.waitkey() is a keyboard binding function and waits for a specified amount of time for any keyboard event. It takes only one argument, which is set to time in milliseconds. If the key is pressed in that time then the program will continue. Passing 0 means it will wait indefinitely for a key.
cv2.imshow("frame", image)
cv2.imshow("mask", mask)
cv2.imshow("result", result)
key = cv2.waitKey(1)
Always clear the stream in preparation for the next frame by calling truncate(0) between captures.
OpenCV detects the green object in my room and records it.
Full Project Code
import cv2
import numpy as np
from picamera.array import PiRGBArray
from picamera import PiCamera

def nothing(x):
    pass

cv2.namedWindow("Trackbars")

cv2.createTrackbar("B", "Trackbars", 0, 255, nothing)
cv2.createTrackbar("G", "Trackbars", 0, 255, nothing)
cv2.createTrackbar("R", "Trackbars", 0, 255, nothing)

camera = PiCamera()
camera.resolution = (640, 480)
camera.framerate = 30

rawCapture = PiRGBArray(camera, size=(640, 480))

for frame in camera.capture_continuous(rawCapture, format="bgr", use_video_port=True):
	image = frame.array
	hsv = cv2.cvtColor(image, cv2.COLOR_BGR2HSV)

	B = cv2.getTrackbarPos("B", "Trackbars")
	G = cv2.getTrackbarPos("G", "Trackbars")
	R = cv2.getTrackbarPos("R", "Trackbars")

	green = np.uint8([[[B, G, R]]])
	hsvGreen = cv2.cvtColor(green,cv2.COLOR_BGR2HSV)
	lowerLimit = np.uint8([hsvGreen[0][0][0]-10,100,100])
	upperLimit = np.uint8([hsvGreen[0][0][0]+10,255,255])

	mask = cv2.inRange(hsv, lowerLimit, upperLimit)

	result = cv2.bitwise_and(image	, image	, mask=mask)

	cv2.imshow("frame", image)
	cv2.imshow("mask", mask)
	cv2.imshow("result", result)

	key = cv2.waitKey(1)
	rawCapture.truncate(0)
	if key == 27:
		break

cv2.destroyAllWindows()
Project Videos
Check out the videos below to see the code in action!