Learn how to use OpenCV on a Raspberry Pi to draw different geometric shapes and recognize facial features.
In this article, you are going to learn how to use OpenCV to draw different geometric shapes. We will begin by drawing different geometric shapes on a black image, and then we will detect faces in an image and draw circles around the faces.
If you are new to using OpenCV on a Raspberry Pi, check out the previous article on setting up and getting started.
Python Code to Draw Geometric Shapes
The code below will draw lines, ellipses, circles, rectangles, polylines, and text on the black image. Copy this code and execute it. We’ll go over the details on how the code works below.
import cv2
import numpy as np

# Create a black image
img = np.zeros((512, 512, 3), np.uint8)

# img = cv2.line(image, (starting point), (Ending point), (color), line thickness)
img = cv2.line(img, (0, 256), (512, 256), (255, 0, 0), 10)

# cv2.Ellipse(img, center, axes, angle, start_angle, end_angle, color, thickness=1)
img = cv2.ellipse(img,(256,256),(50,50),180,0,180,(255, 255, 0),-1)
img = cv2.ellipse(img,(256,256),(50,50),0,0,180,(0, 255, 0),-1)

# cv2.Circle(img, center, radius, color, thickness)
img = cv2.circle(img, (256, 256), 56, (0, 0, 255), 10)

# img = cv2.rectangle(image, (Top Left Corner), (Bottom Right Corner), (color), thickness)
img = cv2.rectangle(img, (189, 189), (323, 323), (0, 255, 0), 10)

# cv2.PolyLine(img, polys, is_closed, color, thickness=1)
pts = np.array([[10,5],[20,30],[70,20],[50,10]], np.int32)
pts = pts.reshape((-1,1,2))
img = cv2.polylines(img,[pts],True,(0,255,255))

# cv2.PutText(img, text, org, fontFace, fontScale, color, thickness, line type)
font = cv2.FONT_HERSHEY_SIMPLEX
cv2.putText(img,'OpenCV',(10,500), font, 4,(255,255,255),2,cv2.LINE_AA)

# Create the resizeable window
cv2.namedWindow('image', cv2.WINDOW_NORMAL)
cv2.imshow('image', img)
cv2.waitKey(0)
cv2.destroyAllWindows()
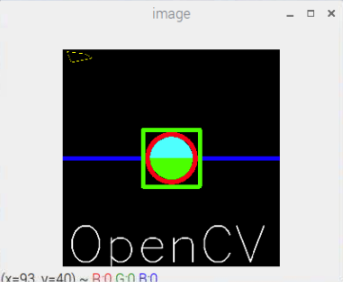
Running the code will open up this output:
Code Breakdown
First, we import the required packages. The OpenCV package helps us draw different geometric shapes and the NumPy package allows us to create a blank image and do other mathematical operations.
import cv2
import numpy as np
Next, we create a black image on which we can draw geometric shapes.
img = np.zeros((512, 512, 3), np.uint8)
Then we use the cv2.line() function to draw a diagonal blue line with a thickness of 5 px. We will draw a blue line on the black image from center left to center right.
The cv2.line() function takes five arguments:
- The image file
- The starting points (where on the image line will start)
- The ending points
- The color of the line
- The thickness of the line
#img = cv2.line(image, (starting point), (Ending point), (color), line thickness)
img = cv2.line(img, (0, 256), (512, 256), (255, 0, 0), 10)
Now, we are going to draw two ellipses at the center of the image. To draw the ellipse, we need to pass several arguments:
- The image file
- The center location (x, y)
- The major and minor axes lengths
- The angle of rotation of ellipse in anti-clockwise direction
- The start and end angle (the start and end angle denote the starting and ending of the ellipse arc measured in a clockwise direction from the major axis, i.e., giving values 0 and 360 gives the full ellipse)
- The color of the ellipse
- The thickness of ellipse (-1 means it will fill the shape)
#cv2.ellipse(img, center, axes, angle, start angle, end angle, color, thickness=1)
img = cv2.ellipse(img,(256,256),(50,50),180,0,180,(255, 255, 0),-1)
img = cv2.ellipse(img,(256,256),(50,50),0,0,180,(0, 255, 0),-1)
Next, we are going to draw a red circle over the ellipse. To draw a circle, we need to pass image file, center coordinate, radius of the circle, color in (B, G, R) format and thickness of circle.
#cv2.Circle(img, center, radius, color, thickness)
img = cv2.circle(img, (256, 256), 56, (0, 0, 255), 10)
After that, we draw a green rectangle over the circle. To draw a rectangle, you need the top-left corner and the bottom-right corner of your rectangle.
#img = cv2.rectangle(image, (Top Left Corner), (Bottom Right Corner), (color), thickness)
img = cv2.rectangle(img, (189, 189), (323, 323), (0, 255, 0), 10)
To draw a polygon, we need the coordinates of the vertices. Make those points into an array of shape ROWS x 1 x 2 where ROWS are the number of vertices and it should be of type int32.
Here we draw a small polygon of with four vertices in yellow color.
pts = np.array([[10,5],[20,30],[70,20],[50,10]], np.int32)
pts = pts.reshape((-1,1,2))
# cv2.PolyLine(img, polys, is_closed, color, thickness=1)
img = cv2.polylines(img,[pts],True,(0,255,255))
To put text in images, we need to provide text data that we want to write, position coordinates of where we want put it (i.e., bottom-left corner where data starts), font type, font scale (specifies the size of font), color, thickness, and lineType.
#cv2.PutText(img, text, org, fontFace, fontScale, color, thickness, line type)
font = cv2.FONT_HERSHEY_SIMPLEX
cv2.putText(img,'OpenCV',(10,500), font, 4,(255,255,255),2,cv2.LINE_AA)
Python Code to Detect Faces and Draw Circle on Faces
Now we are going to write the code that will detect the faces in an image and draw circles around the faces. For detecting faces, we are going to use the Haar cascade classifier. OpenCV already contains many pre-trained classifiers for face, eyes, smile, and more. The classifier we are going to use will detect faces. You can get the cascade file here.
Save this file in the working directory as "haarcascade_frontalface_default.xml".
Python code is as follows:
# Import OpenCV library
import cv2

# Load a cascade file for detecting faces
faceCascade = cv2.CascadeClassifier("haarcascade_frontalface_default.xml");

# Load image
image = cv2.imread('obamafamily.jpg')

# Convert into grayscale
gray = cv2.cvtColor(image, cv2.COLOR_BGR2GRAY)

# Look for faces in the image using the loaded cascade file
faces = faceCascade.detectMultiScale(gray, 1.2, 5)
for (x,y,w,h) in faces:
	# Create circle around faces
    cv2.circle(image, (int((x + x + w)/2), int((y + y + h)/2)), int(h/2), (0, 255, 0), 5)

# Create the resizeable window
cv2.namedWindow('Obama', cv2.WINDOW_NORMAL)

# Display the image
cv2.imshow('Obama', image)

# Wait until we get a key
k=cv2.waitKey(0)

# If pressed key is 's'
if k == ord('s'):
    # Save the image
    cv2.imwrite('convertedimage.jpg', image)
    # Destroy all windows
    cv2.destroyAllWindows()
# If pressed key is ESC
elif k == 27:
    # Destroy all windows
    cv2.destroyAllWindows(
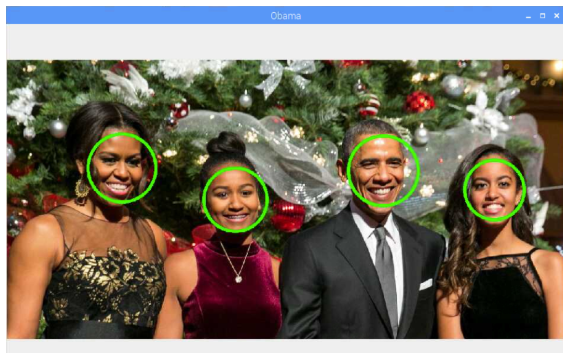
After running the code, the program creates circles around the faces it detects in the image.