Learn how to connect DC motors to an Arduino using the openFrameworks and Wekinator platforms.
This guide will cover how to control motors using the openFrameworks face tracker mode. The motors will be connected to an Arduino and the data processed through the Wekinator software program.
The input data will be transferred from the Wekinator to the openFrameworks platform. The face tracker mode used in openFrameworks will send the x, y, and width measurements of the face detected.
The Wekinator will be trained according to the input values and send the output data to processing—which forwards it to an Arduino that controls the motors.
In this guide, we'll record samples for four outputs:
- For a face that appears in front of the camera.
- For a face that appears to the right of the camera.
- For a face at a certain distance from the camera.
- For objects that appear in front of the camera.
The installation file for openFrameworks, as well as the face tracking feature, is available on the Wekinator website.
Image displaying the location of the face tracking download file on Wekinator website.
Once you download the face tracking file, unzip it and run the program. It should activate the computer webcam to track the face of the user.
An example image of the face tracker program using a computer webcam to identify a face.
Processing Instructions
On the processing side, this guide will require using a sketch that will receive the output data from the Wekinator software and forward it to the Arduino.
import vsync.*; // Importing the library that will help us in sending and receiving the values from the Arduino
import processing.serial.*;  // Importing the serial library

// Below libraries will connect and send, receive the values from wekinator
import oscP5.*;
import netP5.*;

// Creating the instances
OscP5 oscP5;
NetAddress dest;
ValueSender sender;

// These variables will be syncronized with the Arduino and they should be same on the Arduino side.
public int output;


void setup()
{
  // Starting the serial communication, the baudrate and the com port should be same as on the Arduino side.
  Serial serial = new Serial(this, "COM10", 115200);
  sender = new ValueSender(this, serial);

  // Synchronizing the variables as on the Arduino side. The order should be same.
  sender.observe("output");

  // Starting the communication with wekinator. listen on port 12000, return messages on port 6448
  oscP5 = new OscP5(this, 12000);
  dest = new NetAddress("127.0.0.1", 6448);
}

// Recieve OSC messages from Wekinator
void oscEvent(OscMessage theOscMessage) {
  if (theOscMessage.checkAddrPattern("/wek/outputs") == true) {
    // Receiving the output from wekinator
    float value = theOscMessage.get(0).floatValue();

    // Converting the output to int type
      output = int(value);
  }
}

void draw()
{
  //  Nothing to be drawn for this example
}
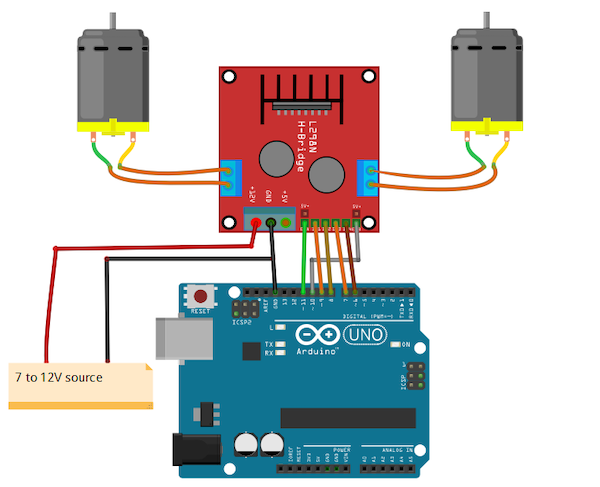
Connecting DC Motors to the Arduino
Schematic of motors connected to an Arduino UNO.
Arduino Code
#include <VSync.h>    //Including the library that will help us in receiving and sending the values from processing
ValueReceiver<1> receiver;  /*Creating the receiver that will receive only one value.
  Put the number of values to synchronize in the brackets */

/* The below variable will be synchronized in the processing
  and it should be same on both sides. */
int output;

//Motor Pins
int EN_A = 11;
int IN1 = 9;
int IN2 = 8;
int IN3 = 7;
int IN4 = 6;
int EN_B = 10;

void setup()
{
  /* Starting the serial communication because we are communicating with the
    Processing through serial. The baudrate should be same as on the processing side. */
  Serial.begin(115200);
  //Initializing the motor pins as output
  pinMode(EN_A, OUTPUT);
  pinMode(IN1, OUTPUT);
  pinMode(IN2, OUTPUT);
  pinMode(IN3, OUTPUT);
  pinMode(IN4, OUTPUT);
  pinMode(EN_B, OUTPUT);

  digitalWrite(EN_A, HIGH);
  digitalWrite(EN_B, HIGH);

  // Synchronizing the variable with the processing. The variable must be int type.
  receiver.observe(output);
}

void loop()
{
  // Receiving the output from the processing.
  receiver.sync();
  // Matching the received output to light up led's
  if (output == 1)
  {
    //Forward
    digitalWrite(IN1, LOW);
    digitalWrite(IN2, HIGH);
    digitalWrite(IN3, LOW);
    digitalWrite(IN4, HIGH);
  }

  else if (output == 2)
  {
    //Right
    digitalWrite(IN1, HIGH);
    digitalWrite(IN2, LOW);
    digitalWrite(IN3, LOW);
    digitalWrite(IN4, LOW);
  }
  else if (output == 3)
  {
    //Left
    digitalWrite(IN1, LOW);
    digitalWrite(IN2, LOW);
    digitalWrite(IN3, HIGH);
    digitalWrite(IN4, LOW);
  }
  else if (output == 4)
  {
    //Stop
    digitalWrite(IN1, LOW);
    digitalWrite(IN2, LOW);
    digitalWrite(IN3, LOW);
    digitalWrite(IN4, LOW);
  }
}
Using Face Detection in Wekinator
The 'Create new project' window in the Wekinator software program.
Click on 'Next' and the 'New Project' window will display as shown below.
The 'New Project' window in the Wekinator software program.
Record some tests by placing your face close to the camera. Designate the classifier output value to '1.' You'll also want to record a short sample of this movement.
An example image displaying how the face tracker feature identifies a face close to the camera.
Next, move your face to the right side of the screen and change the classier output value to '2.' Once again, record the movement.
An example image displaying how the face tracker feature identifies a face to the right of the camera.
Then move your face further back from the camera and change the classifier output to '3.'
An example image of how the face tracker feature identifies a face further back from the camera.
The last step is to move out of the camera view entirely. Assign the classifier output to '4.'
An example image of the face tracker feature not identifying a face in the camera view.
Now when you click on the 'Train' then 'Run' buttons, the motors should move according to your position on-camera.