Discover how to create a web application to control servo motors using a Raspberry Pi and the Flask web framework.
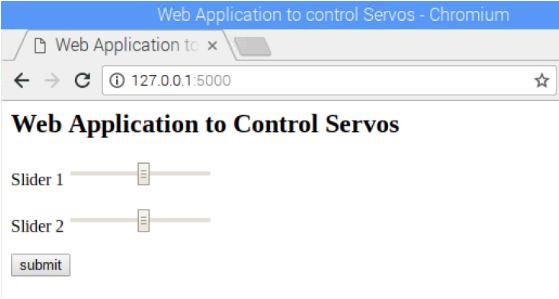
In this post, you are going to learn about how to create a web application on Raspberry Pi to control servo motors using the Flask Web Framework to create the web application. We will create two sliders on the web app that will send a corresponding value, causing the servo motors to move upon pressing the button.
Flask is a web application framework written in Python and developed by Armin Ronacher, who leads an international group of Python enthusiasts named Pocco. Flask is based on Werkzeug WSGI toolkit and Jinja2 template engine. Both are Pocco projects.
Prerequisites
- Make sure your Raspberry Pi is up to date. To update the Raspberry Pi, type the following command: sudo apt-get update
- To install Flask, we need to have pip, so type the following command to install pip: sudo apt-get install python-pip
- Then type the following command to install Flask: sudo pip install flask
Required Components
- Raspberry Pi
- SG90 Servo motors
- Jumper cables
Circuit Diagram and Explanation
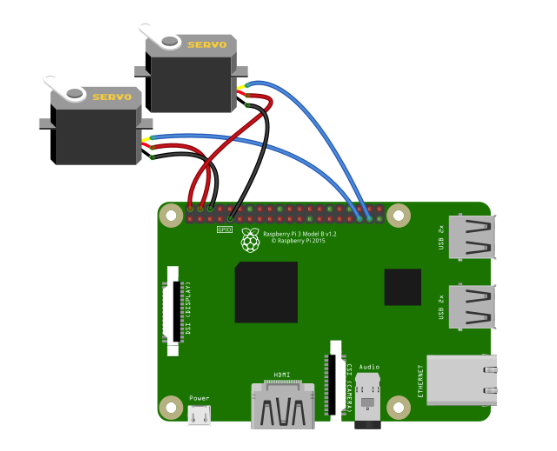
The circuit diagram for this project is very simple — you just need to connect your two servo motors. Make the following connections:
Servo Motor 1 | Servo Motor 2 | Raspberry Pi |
|---|
Yellow or Orange Wire | | GPIO 26 |
Red Wire | | 5V |
Black Or Brown Wire | | GND |
| Yellow or Orange Wire | GPIO 19 |
| Red Wire | 5V |
| Black or Brown Wire | GND |
Code Walkthrough
Let’s breakdown the code used in this project. The full code can be found at the end of the article.
First, we imported the flask modules required for this project. The render_template_string module allows us to use HTML in our projects. The request module allows us to get data from HTML. The RPi.GPIO library allows us to control the GPIO pins of the Raspberry Pi.
from flask import Flask, render_template_string, request
import RPi.GPIO as GPIO
from time import sleep
Now, we enable the debug mode in our project. The advantage of enabling the debug mode is it automatically reloads the server upon changing the code. It also provides a useful debugger to track errors in the application.
app.config['DEBUG'] = True
The servo motor shakes a bit while it is not moving. In order to stop it, we use the following line:
p.ChangeDutyCycle(0)
p1.ChangeDutyCycle(0)
How to Run the Program
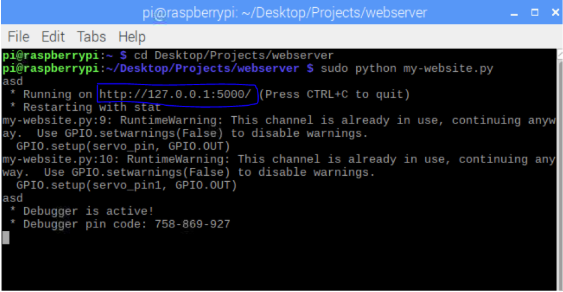
Create a Python file and upload the code. Next, run this file with sudo command to start the server at localhost on port 5000.
Now, pressing the submit button will send the values of the sliders according to which servo motors we are controlling.
Full Code
from flask import Flask, render_template_string, request   # Importing the Flask modules required for this project
import RPi.GPIO as GPIO     # Importing the GPIO library to control GPIO pins of Raspberry Pi
from time import sleep      # Import sleep module from time library to add delays

# Pins where we have connected servos
servo_pin = 26
servo_pin1 = 19

GPIO.setmode(GPIO.BCM)      # We are using the BCM pin numbering
# Declaring Servo Pins as output pins
GPIO.setup(servo_pin, GPIO.OUT)
GPIO.setup(servo_pin1, GPIO.OUT)

# Created PWM channels at 50Hz frequency
p = GPIO.PWM(servo_pin, 50)
p1 = GPIO.PWM(servo_pin1, 50)

# Initial duty cycle
p.start(0)
p1.start(0)

# Flask constructor takes the name of current module (__name__) as argument.
app = Flask(__name__)
# Enable debug mode
app.config['DEBUG'] = True

# Store HTML code
TPL = '''
<html>
    <head><title>Web Application to control Servos </title></head>
    <body>
    <h2> Web Application to Control Servos</h2>
        <form method="POST" action="test">
            <p>Slider 1 <input type="range" min="1" max="12.5" name="slider1" /> </p>
            <p>Slider 2 <input type="range" min="1" max="12.5" name="slider2" /> </p>
            <input type="submit" value="submit" />
        </form>
    </body>
</html>
'''

# which URL should call the associated function.
@app.route("/")
def home():
    return render_template_string(TPL)

@app.route("/test", methods=["POST"])
def test():
    # Get slider Values
    slider1 = request.form["slider1"]
    slider2 = request.form["slider2"]
    # Change duty cycle
    p.ChangeDutyCycle(float(slider1))
    p1.ChangeDutyCycle(float(slider2))
    # Give servo some time to move
    sleep(1)
    # Pause the servo
    p.ChangeDutyCycle(0)
    p1.ChangeDutyCycle(0)
    return render_template_string(TPL)

# Run the app on the local development server
if __name__ == "__main__":
    app.run()
Related Stepper Motor Projects
Check out these other projects that utilize stepper motors in a variety of ways: