Learn about the pros and cons of the different ways to connect a Raspberry Pi to your Wi-Fi.
This article will summarize a few methods you can use to connect your Raspberry Pi to a wireless network as well as discuss a few pros and cons of each method. The procedures, mentioned in this article, should work for the Raspberry Pi 4 as well as earlier Wi-Fi-capable models.
Wi-Fi Connection Using the Desktop App
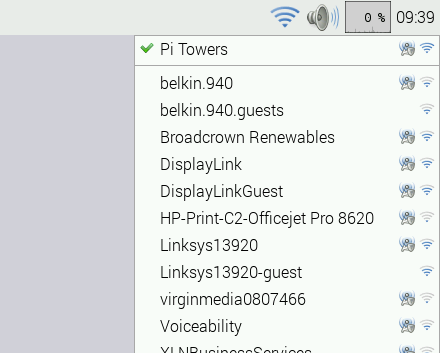
When you use your Raspberry Pi 4 or older versions with a display, keyboard, a mouse, and the desktop environment installed, you can click the wireless symbol in the top-right-hand corner of the Pi’s desktop.
A dropdown menu will open up that’ll allow you to select your network. On the Raspberry Pi 3B+, a country needs to be selected for regulatory reasons before you can make a connection.
Select your network from the dropdown menu. Image courtesy of Raspberry Pi.
Desktop App Setup Pros
- Easy setup, even for beginners.
- No console commands needed.
Desktop App Setup Cons
- Monitor, keyboard, and mouse are required.
- Hidden networks are not displayed.
- The desktop environment needs to be installed.
Using Raspi-Config
Alternatively, you can use Raspi-Config if you have a keyboard and a display attached to your Pi or if you have set up SSH. Either way, you can execute the Raspi-Config application which is a very simple graphical user interface that’ll allow you to change various settings.
Raspi-Config Pros
- Flexible
- Possible with remote access
- No peripherals needed
- The desktop environment not necessary
- No console commands required
Raspi-Config Cons
- SSH needs to be set up for remote access.
- Hidden networks are not displayed.
Using the Command Line
The command-line approach is the most complicated method. However, once it’s set up, it is also the most versatile method. Furthermore, you can even define multiple networking profiles. Just like above, this approach can be used to configure your Raspberry Pi remotely.
Command Line Pros
- Allows the configuration of most options
- No monitor or keyboard needed
- No desktop environment necessary
- Multiple profiles can be created
- Supports the use of hidden networks
Command Line Cons
- You’ll still need access to the Pi (either physically or remotely)
- Complicated, especially for beginners
Headless Wi-Fi Configuration
So far, all the methods mentioned require you to have some kind of access to the Raspberry Pi you want to configure. However, if you want to use the system without peripherals and you don’t want to connect it via an Ethernet cable, you can place a configuration file in the boot folder of a freshly created SD card. When the Pi first boots, the Wi-Fi network gets configured automatically. This method can also be used to enable SSH.
Headless Wi-Fi Configuration Pros
- Completely headless setup possible
- No peripherals needed
- No extra setup needed (for example with an Ethernet cable)
Headless Wi-Fi Configuration Cons
- Typos in the configuration file might cause connection errors that can be hard to debug
- Might be complicated for beginners
Setup over Bluetooth
If you own an Android device, you can use the method described in Connecting Raspberry Pi 3 Wi-Fi Via Bluetooth to connect your Raspberry Pi to a Wi-Fi network. Basically, the Pi runs a Python script that executes the necessary commands, just like you would do manually when it gets prompted to do so by an Android app.
Both the Python script and the APK can be downloaded in the article linked in the previous paragraph.
Wi-Fi Connection Over Bluetooth Pros
- This method makes it easy to switch Wi-Fi networks
- Good for beginners
- No keyboard, mouse, or display needed
Wi-Fi Connection Over Bluetooth Cons
- You have to own an Android device
- Additional Python script and Android app needed
But looking at the steps in the article, you should be able to create your own solution that runs in a web browser instead of an Android app.
Wi-Fi Connection Options are Plentiful
As you can see, there are several methods for connecting your Raspberry Pi to a Wi-Fi network. Regardless of your level of experience and the peripherals, you can find a way to start using Wi-Fi on your board!