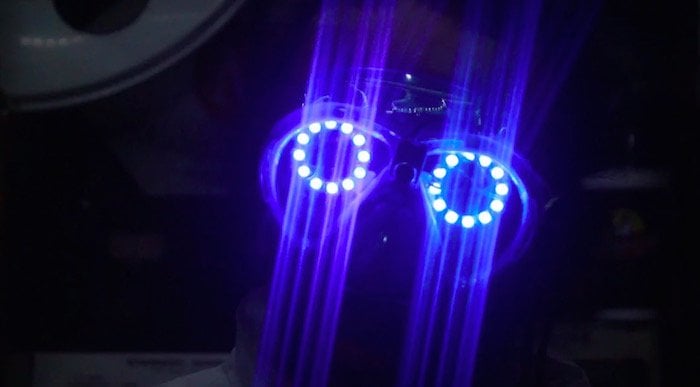
These sound-activated rave goggles react to music — the louder the music, the crazier the light show!
These rave goggles will make quite the scene at your next music festival!
Why?
The shape of the NeoPixel rings used in this project inspired me to create goggles because how many PCBs can you actually look through? With festival season in full swing, I figured some sound activated rave goggles were in order. The louder the music, the crazier the light show! Though, I think I maybe could have found something better than swimming goggles ...
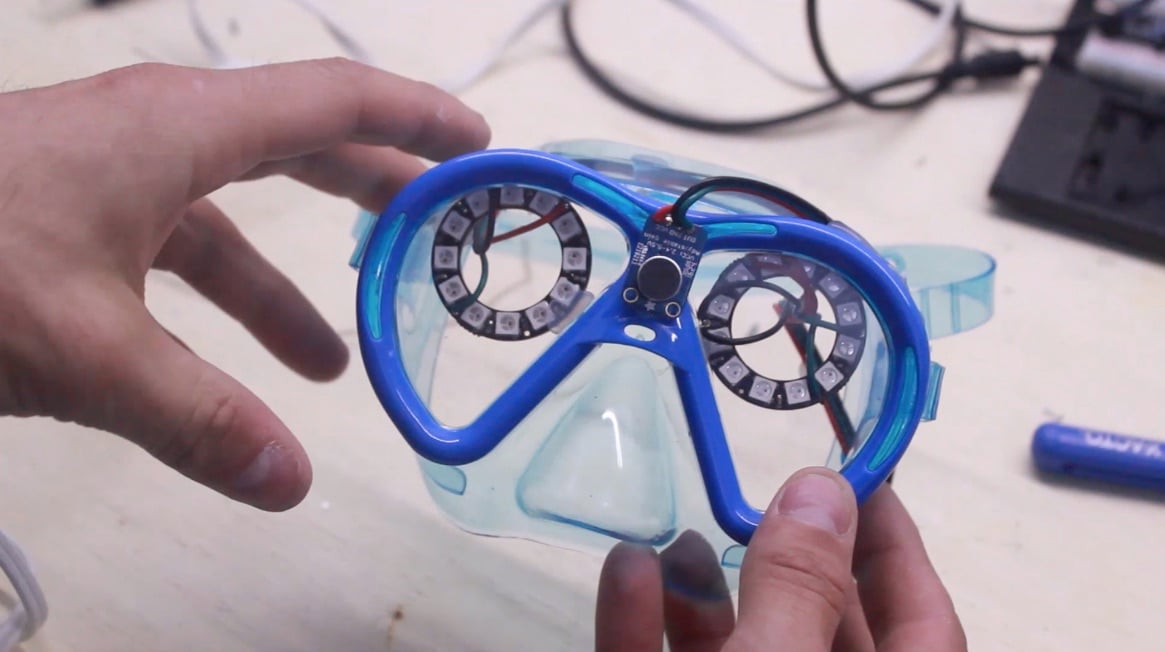
My Rave Goggles without power
How Do the Rave Goggles Work?
The mic/amp breakout uses Maxim Integrated's Max4466 to amplify sound detected by the electret microphone. The breakout circuit outputs an analog voltage directly related to the incoming audio signal picked up by the microphone when it is powered properly. We can use this signal to our advantage by attaching it to an analog input on our microcontroller.
Changes in volume are detected by comparing the analog-to-digital converter's (ADC) result to a threshold value that we include in our program. With some test signal, we can analogRead() the varying signal level on our analog input pin. Using thresholds, we set three different volume categories and adjust the NeoPixel's color accordingly.
The Max4466 breakout board
NeoPixels are Adafruit's brand of individually addressable, 5V RGB pixels that communicate over single wiring communication. Minimal wiring makes them perfect for concise projects like ours here. NeoPixels, however, wouldn't be as simple to use if it wasn't for Lady Ada's handy NeoPixel library. Utilizing Adafruit's example code, we can get things up and running and have our neopixels reacting to our audio signal in no time.
It is important to read Adafruit's page on proper NeoPixel care because they are sensitive components. It is usually recommended to have a 300-550 ohm resistor in the data line but luckily, our NeoPixel rings include this for us in the PCB already.
For the Rave Goggles, I used the wiring diagram from a similar project of theirs, which uses a different MCU and power supply, though the NeoPixel wiring remains the same.
To power my Nano, I used a micro USB cable and cut off the opposing end, stripping back the red and black wires which are positive and negative power, respectively. These wires were connected to my quadruple AA battery pack. Later, I realized that the best practice to use only three AA batteries, which yields 4.5V rather than 6V, though it did not affect performance for this project.
The colors and animation can be adjusted using relatively simple commands found within the example projects. I created three different volume categories using threshold ranges to make the pixels react to sound. If the analog voltage value is within a certain range, it adjusts the pixels color or animation accordingly. When the sound is the loudest, it makes the pixels go crazy! The codes for the threshold and color settings can be found below.
Ready for the next festival!
Threshold Range Code
sound = analogRead(A0);
delay(100);

if (sound < 400) {
green(); }

if (sound >= 401 & sound <= 699) {
yellow();
}

if (sound >= 700) {
rainbow(20);
}
Color Settings Code
void green() {

for (int i = 0; i < NUMPIXELS; i++) {

// pixels.Color takes RGB values, from 0,0,0 up to 255,255,255
pixels.setPixelColor(i, pixels.Color(0, 150, 0)); // Moderately bright green color.

pixels.show(); // This sends the updated pixel color to the hardware.

delay(delayval); // Delay for a period of time (in milliseconds).

}
}

void yellow() {

for (int i = 0; i < NUMPIXELS; i++) {

// pixels.Color takes RGB values, from 0,0,0 up to 255,255,255
pixels.setPixelColor(i, pixels.Color(255, 100, 0)); // Yellow color.

pixels.show(); // This sends the updated pixel color to the hardware.

delay(delayval); // Delay for a period of time (in milliseconds).

}
}

void rainbow(uint8_t wait) {
uint16_t i, j;

for(j=0; j<256; j++) {
for(i=0; i < strip.numPixels(); i++) { //fade through all colors
strip.setPixelColor(i, Wheel((i+j) & 255));
}
strip.show(); // This sends the updated pixel color to the hardware.
delay(wait);
}
}
Sound Activated Rave Goggles Code
Ultimately, this is a pretty simple project so wire everything up and get out on the dance floor! Remember to poke nose holes in your swimming goggles for best breathing!